
Key topics
What’s the “set priority” feature? Why would I use it?
Is AlwaysUp running an important, CPU-hungry application for you? Does that application deserve more resources than other programs on the machine? If so, you’re in luck because AlwaysUp can speed up your mission-critical app by giving it more CPU cycles.
But before we dig into how to do that in AlwaysUp, let’s explore the Windows technology behind the feature.
How Windows runs applications
Windows is a multi-tasking operating system, where your machine’s CPUs are shared between all the programs running on your computer. Behind the scenes, each program gets a periodic slice of the CPUs as Windows cycles through them all.
By default, all programs are treated the same and the CPUs are allocated equally between them. For example, if there are a 100 programs running, each is offered 1/100th of the CPUs over the course of a minute.
But Windows understands that not all programs are equivalent. Some deserve more of your computer’s precious CPU cycles, while others need less.
To support those differing needs, Windows offers a flexible CPU scheduling priority system. With that, you’re able to tell Windows if your application needs more CPU, or less.
AlwaysUp taps into the Windows scheduling system, making it possible for you to tailor your application’s CPU use as it runs as a Windows Service.
Why set my application’s priority?
In general, you do it to make your AlwaysUp application run faster.
And why not give your program a boost — especially if it’s the most important application running on your computer?
We’ll show you how adjust priority in the next section.

How do I set my application’s priority in AlwaysUp?
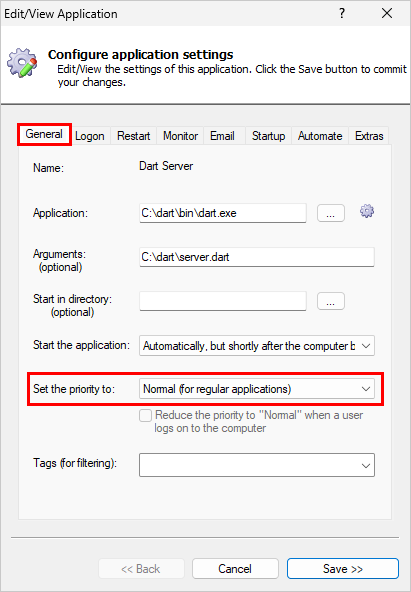
You can set your application’s CPU priority on the General tab:
Select the best value for your application from the dropdown menu:
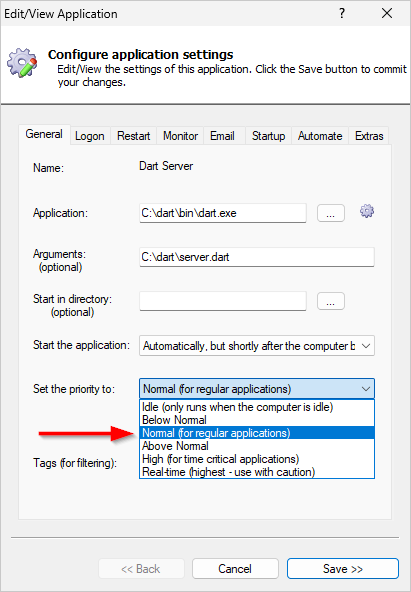
Here’s what each option will do:

 Idle (only runs when the computer is idle)
Your application will only be assigned a CPU when no other program needs it. That is, only when the computer is idle.
This setting is great for background tasks that should always defer to programs.
Below Normal
Your application needs regular CPU cycles but it’s OK if other programs take most of the CPU. “Below Normal” is appropriate for low-priority tasks that are happy to wait while normal activities take precedence.
Normal
“Normal” is the default priority and most applications run at this level. Windows will allocate a fair and balanced amount of CPU to ensure that your application makes steady progress.
Above Normal
Windows will assign your application a bit more CPU than normal — but not so much that it “starves” other applications.
This is a safe choice if you want to provide a moderate boost for your application.
High
When you select “High”, Windows will move your application to the front of the line and give it the CPU whenever it can use it. That will certainly boost your application but it may prevent other, lower priority applications from running.
Real-time (highest – use with caution)
Set your application’s priority to “Real-time” in the rarest of circumstances. That’s because it’s the highest level and Windows will schedule you application ahead of vital system tasks, and that can lead to unwelcome behavior.
Keep in mind that while AlwaysUp provides the real-time option for completeness, we’ve never come across a real-world situation where it was the answer. Caveat emptor.
What are your best tips for setting CPU priority?
Tip #1: “Above normal” is enough for most applications
If you’re running an important application that should take priority over others, we recommend boosting priority to “Above normal”.
Doing so will ensure that your app takes precedence over all regular applications — but not at the expense of critical operating system functions.
You probably don’t need to go all the way to “High” priority, and almost certainly never to “Real-time”.
Tip #2: Consider limiting your application to specific CPUs too
In addition to setting CPU priority, AlwaysUp can also run your application on specific CPUs. You may find that level of control helpful when you’re managing many applications and need to constrain how CPUs are assigned.
You can find the CPU assignment controls on the Extras tab:
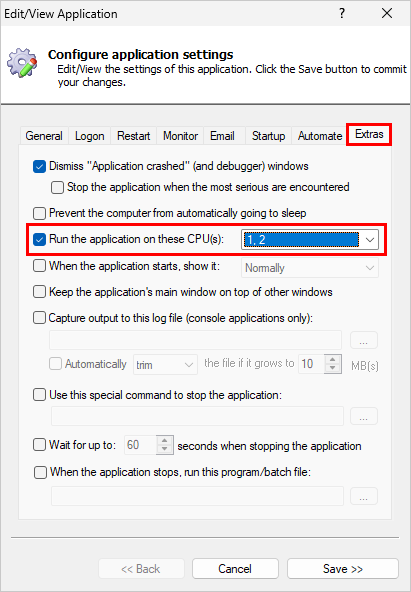
Just pick one or more CPUs and you’ll be good to go.