The Schedule service implements part of the Windows Task Scheduler — an important operating system component. The service’s display name is Task Scheduler and it runs inside the service host process, svchost.exe:
The Schedule service is responsible for automatically launching executables, batch files and scripts (i.e. tasks) on your PC, without human intervention. It can start each task:
At a fixed day and time (e.g. “every night at 11 PM”)
When someone logs on to the computer
When the system is booted
When the machine becomes idle
When a specific system event occurs
The pool of tasks to be run by the service is managed by the Task Scheduler application. Find it in the Control Panel (it may be called “Scheduled Tasks”), or launch the program directly by running taskschd.msc.
From the main window, navigate into the Task Scheduler Library to see all the tasks that the Schedule service will run. Here we see a task that updates the Dropbox cloud storage software — set to run every day at 12:48 PM:
What happens if I stop the Schedule service?
No scheduled tasks will run when the service is stopped.
This may be of little consequence on a machine with a handful of optional jobs, but it will be a catastrophe on a server that relies on scheduled tasks to perform mission-critical maintenance.
Be sure to understand which camp you are in before stopping the Schedule service!
The “Stop” button is disabled. How can I stop the Schedule service?
If you look closely at the service’s screenshot, you will notice that the Stop button is disabled — indicating that the service cannot be stopped.
And even the versatile NET STOP command run as an administrator will fail, citing insufficient rights (“Access is denied”):
Evidently Microsoft is telling us, ever so gently, that we shouldn’t stop the service. 🙂
However — if you are hell-bent on ignoring Microsoft’s advice — there is a way forward. You can use our free Service Security Editor tool to rejigger permissions and grant yourself the ability to stop the service.
In their guidance on disabling system services on Windows Server 2016, Microsoft does not classify the Task Scheduler service as “Do Not Disable”. Indeed, they punt on guidance altogether, commenting that “the impact of disabling the service has not been fully evaluated”. However, they do recommend that the Schedule service remains enabled.
Reboot your computer. Hopefully you have fallen victim to a temporary glitch and sanity will be restored when the operating system next starts.
Manually run Windows Update. If you’re lucky, the Microsoft Windows engineers have already found and fixed the problem with their software.
Seek expert help. Start with a google search for a quick fix; move on to your local administrator if no resolution is forthcoming.
Reinstall Windows. You may have to start over from scratch if nothing else works… 🙁
Questions? Problems?
If you would like to know more about the Windows Schedule service, or you have a specific problem, please feel free to get in touch. We will do our best to help you!
I’m using AlwaysUp to run Google Backup and Sync. I only receive emails when I manually stop and start the service — NOT WHEN my server restarts. I’m positive that all the settings are correct after double checking with one of my other installations that works fine (I have 2 licenses). What is the problem?
— Hassan Asif
Hi Hassan, sorry to hear of the trouble! We have seen this with one customer before, so we have a potential fix.
The problem: AlwaysUp is starting before important Windows Services are ready
Ever been to a Black Friday sale? It’s like that when your PC starts — controlled chaos.
The eager shoppers are the Windows Services configured to start automatically at boot. Windows launches them as soon as possible, in well-defined waves, but as new processes fight for your computer’s precious resources (CPU, RAM, etc.) it is impossible to predict when any one service will actually be ready.
For example, let’s look at the DHCP Client service. It registers an IP address for your computer — an important step that must be completed before any network operations can succeed. But since the DHCP service is launched along with several other (equally important) services, it may be available after 10 seconds today while tomorrow it may take 12 seconds to be ready. Each boot is different, and you cannot know precisely when the service will be primed.
Since you followed our tutorial, the AlwaysUp service running your Backup and Sync is configured to participate in the “mad rush” at boot. This is usually fine, but in your case I suspect that AlwaysUp is starting up too soon — before one of the important services required for sending email is fully prepared.
We have seen this before, on a beefy machine with 16 processors and 32 GB of RAM. Is the computer experiencing the problem much faster than the one that sends email properly?
Fortunately we were able to come up with a remedy…
The solution: Delay AlwaysUp, to give email-related Windows Services more time to get ready
If our diagnosis is correct, then the fix is to make the AlwaysUp service start only after all important networking and email services are ready.
But since there is no way to know exactly when all those services will be ready, the best we can do is to remove AlwaysUp from the “mad rush” and have it start a couple of minutes later. Luckily Microsoft (and AlwaysUp) has already provided a setting that does exactly that!
To delay the launching of your AlwaysUp Backup and Sync service:
Start AlwaysUp.>
Edit your application (by selecting Application > Edit/View).>
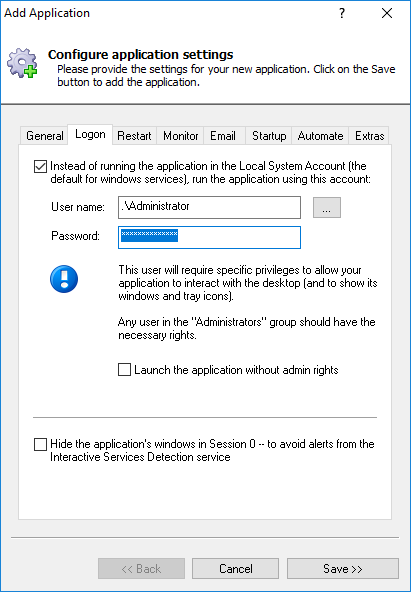
On the General tab, change the Start the application setting to Automatically, but shortly after the computer boots:
Click Save to record your change.>
With that setting in place, Windows will fire up the Backup and Sync service 1-2 minutes after boot — well after the mad rush. That should be enough time for the critical services to start.
And the delay shouldn’t be a problem for Backup and Sync since it isn’t required the “instant” that your machine starts. No rush there.
Posted onFebruary 4, 2019 (Revised January 7, 2023)
Are you running Dropbox as a Windows Service? Do you rely on Dropbox to operate unattended in the background, synchronizing your important files 24×7?
If so, then be on the lookout for the new Selective sync warning dialog — a popup window that requires your confirmation whenever a file is deleted. Left unanswered, it will stop Dropbox dead in its tracks and prevent all future synchronization!
Checking the Don’t ask me this again box will eliminate the warning going forward — a welcome capability. It’s certainly an improvement over having to dismiss the window on each delete! Thanks you, Dropbox developers, for providing the checkbox.
But having the only control in the warning itself means that we can only make the “don’t ask” selection when the warning is triggered. And who knows if we’ll be around then?
Unfortunately Dropbox (and AlwaysUp) user howeboards has fallen victim to the prompt. He describes the situation in this support forum post:
On the server, the Dropbox account “A” as configured under AlwaysUp in “service” mode is configured to run under the same Windows administrator account as what it would be if one was to log in to the server. It is still the same user account that it is “running as” in either case with the same configuration and the same Dropbox directory location.
Because this server is hosted in Azure, is taken off-line overnight and/or might reboot, it is not ideal to have to log in to the server to make sure Dropbox is running. So the permission issue I mentioned is because an automated process deleted a file or moved a file, and no one was there to click a dialog regardless if it was running in the foreground or the background. To work around this, I have had to manually restart Dropbox in that user’s foreground session to click the dialog to make it remember it. That is just plain crazy.
Crazy indeed! We can surely do better.
Any Dropbox developers reading? Please implement one of these alternatives for future warnings
In addition to the graphical controls in the warnings, can you please include viable options for those of us running Dropbox unattended?
Here are some suggestions to avoid those unwelcome prompts:
Add a specific option to the settings window
Add a new checkbox labeled “Don’t warn me when deleting files”. Checking it would eliminate the warning without having to interact with Dropbox at some obscure time.
Add a general “Don’t warn me” option to the settings window
This broad setting would apply to all current and future warnings — not just the specific one raised in this article.
Such a powerful control may seem reckless, but I can assure you: Many of your customers would happily avoid any confirmation that has the power to cripple synchronization for several hours!
Introduce (and document) a registry value that governs the warning
This approach puts technical folks in the driver’s seat, but with zero impact (and complexity) on the user interface.
Well, today we can offer you a third option — one that doesn’t rely on additional software, like the Task Scheduler.
By leveraging the powerful Sanity Check feature — which allows you to plug in your own failure detection system — we can get AlwaysUp to close and restart your program every few hours.
Here is an example of how to set that up:
Example: Restart OneDrive every 4 hours
For this example, we’ll work with Microsoft OneDrive — already installed as a Windows Service on our Windows 10 machine.
First, create a simple batch file with these two commands:
@echo off exit 1
Save the file in your AlwaysUp installation folder, C:\Program Files (x86)\AlwaysUp. We have named our batch file “SignalRestartSanityCheck.bat”.
Start AlwaysUp.
Select Application > Edit/View to open OneDrive in AlwaysUp.
Switch to the Monitor tab.
Check the Whenever it fails a “sanity check” box mid-way down the page, and click the triple-dots button on the right:
In the window that comes up, enter the full path to the batch file you created in the Run field.
And set the Every controls to 240 minutes (i.e. 4 hours):
Confirm and save all your changes.
Now whenever we start OneDrive as a service with AlwaysUp button (or the computer is rebooted), this sequence will play out:
AlwaysUp starts OneDrive.
After 4 hours have passed, AlwaysUp runs the batch file (sanity check).
The batch file exits with 1, signaling to AlwaysUp that OneDrive should be stopped.
AlwaysUp stops OneDrive.
AlwaysUp restarts OneDrive (as specified on the Restart tab).
And the cycle repeats… (go to step 2)
UPDATE: Automatically restart your application every 2, 4, 6, 8 or 12 hours — directly from AlwaysUp
AlwaysUp version 11.8 introduced the ability to restart your application much more frequently.
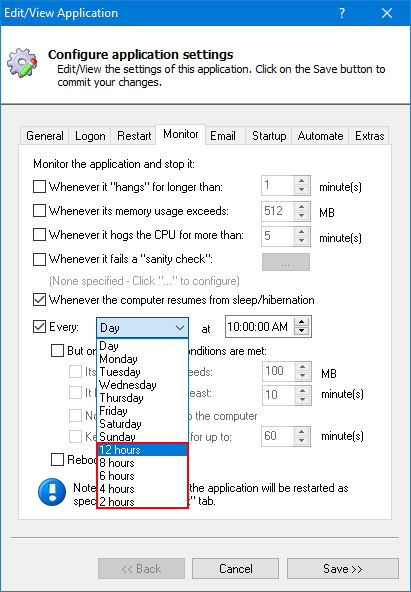
The new periods are available in the Every setting on the Monitor tab. Expand the drop-down to select the desired time frame:
Posted onJanuary 22, 2019 (Revised February 4, 2023)
In recent months, several customers running OneDrive as a service have complained of torturously slow uploads. Files created on a PC take a very long time to appear in the cloud. In one case, it took more than 3 days for a small Word document to show up on OneDrive’s website!
The first instinct was to suspect AlwaysUp. Perhaps running as a Windows Service had somehow crippled OneDrive. But a few tests quickly disproved that theory. The performance problem showed up even when OneDrive was started normally on the desktop, outside of AlwaysUp.
The mystery has persisted for several months but recent feedback on various forums suggest that there may be a workaround. Apparently disabling the new Files On-Demand feature often restores sanity.
What is OneDrive Files On-Demand?
Files On-Demand is Microsoft’s attempt at making more efficient use of your hard drive. Instead of automatically transferring each file in the cloud onto your PC as soon as possible, OneDrive will delay the transfer of each file until you explicitly open it.
You can turn Files On-Demand on or off from your OneDrive Settings window. Right-click on the OneDrive tray, select Settings from the menu and move to the Settings tab in the window that comes up. The Files On-Demand option appears at the bottom of the form. It appears to be on by default:
Files On-Demand trades space for speed of access. For example, let’s say you have a 10 MB PowerPoint presentation in the cloud. Without Files On-Demand, that document will be automatically copied to your computer, immediately consuming 10 MB on your hard drive. With Files On-Demand, OneDrive will “know about” the file but will not automatically transfer it. Your hard drive stores 10 MB less — great.
But the downside of Files On-Demand becomes evident when you need to use the file. Without Files On-Demand, you simply double-click the file and away you go. The document loads quickly because it is already on your computer.
With Files On-Demand enabled, double-clicking the PowerPoint issues a command to the cloud to dynamically download the file. At best you wait a few seconds for the download to complete and the file to open; at worst you can’t retrieve the document because you are not connected to the Internet.
As contributor Craig Long points out, “Files On-Demand is for those who have limited space available or for those who only occasionally need to open a file”. It’s a fine choice for individuals/hobbyists looking to conserve precious resources.
However, please be cautious when considering Files On-Demand in a professional setting. It would be a disaster in an office where OneDrive is mapped to a shared folder because the files not downloaded would never fully show up on the shared drive!
And furthermore, as Microsoft mentions, “you cannot search the contents within online-only files because they aren’t stored on the device” — a potential deal-breaker in a commercial environment.
Complaints of slow uploads with Files On-Demand
Several folks experiencing slowness were able to speed things up by disabling Files On-Demand. Here is one data point from the popular OneDrive forum hosted by UserVoice:
I have been waiting a week for the sync to complete, speeds is about 0,2kb/sec. My internet speed is 1GB/1GB. Then I turned off “sync on demand”. BOOM!!! Speed up to 15mb/sec. A factor 75.000 faster.
“John S” had a similar comment:
I had this same issue with large upload batches from my Mac (uploading about 13GB worth of data from a prior DropBox repository into a SharePoint location on Office 365 tenant) and figured out resolution myself after unsuccessful calls to MS Support: SOLUTION: turn OFF “Files on Demand”. Once off, I got normal upload speeds.
Apparently there may be problems with the new feature.
How to disable Files On-Demand
You can easily turn off Files On-Demand by un-checking the box on OneDrive’s settings page (available by right-clicking on the tray icon). Click OK on the conformation window to commit your changes:
Hopefully this simple change will put the spring back in OneDrive’s step!