Posted onAugust 6, 2024 (Revised December 13, 2025)
We’ve been deploying AlwaysUp with our products for years. We use it to run as services, many small programs we have developed as simple “stay in the tray area” windows applications.
But lately, my co-workers have been criticizing that approach. They say that what AlwaysUp does is “dirty” because “Windows Services should not have any user interface”. They are afraid that one day Microsoft will want to enforce this by making it impossible to run any application that tries to open a user interface as a service. And then AlwaysUp wouldn’t work for our programs.
Do you think this true or are my colleagues mistaken?
By the way, I’m kinda reluctant to convert all our small programs — developed in Delphi — to proper services because debugging a Windows Service in Delphi is a huge pain and very rarely works (no matter what Embarcadero says). Thanks for creating a pragmatic alternative!
— Carlo
Hi Carlo, thanks for reaching out.
Your colleagues are mostly right when they say “Windows Services should not have any user interface”. Indeed, that’s very common advice given to developers constructing services today.
But in reality, that statement is overly restrictive and misses the mark. A careful reading of Microsoft’s technical articles and documents reveals that interfaces alone aren’t bad. And Microsoft’s actual advice to those developing services is “don’t design a Windows Service that must interact directly with a logged-in user”.
And, in light of that more accurate statement, you’ll be happy to know that there’s no indication that Microsoft will ever prohibit a Windows service from creating an interface. It simply won’t happen.
Let’s dive into the details to understand why.
What are the problems with a Service having a UI?
Back in the ancient days of Windows XP, Microsoft was happy for any Windows Service to present a user interface. It was even encouraged and many, many applications took advantage of that convenient design.
You see, Windows Services run in Session 0 — the session created when your PC boots. And because of that, all windows created by a service show up in Session 0. That’s always been the case — and remains so today.
In XP and before, the user logging in to the console would also be assigned to Session 0. All their desktop applications would run in that shared session too. As a consequence, that user would see any windows created by a service alongside his own, running on his desktop. This picture from Microsoft’s blog illustrates the arrangement:
Unfortunately, that lax architecture created a couple of problems.
Problem #1: Support for multiple simultaneous logins complicated interactive services
The visibility of interactive services was clear when only a single user could log in to Windows. The user who logs in could see any UI elements the services created.
But with the advent of Fast User Switching — where multiple people can log into a PC simultaneously — the situation became murky. Important considerations like these arose:
Why does a service’s UI only show up for only one person at a time?
Why can’t everyone logged in see the windows from an interactive service?
How can we make sure that the “right” user sees the service’s windows?
Unfortunately, there were no good answers for those questions. And as a result, we had strike one against interactive services on modern computers.
Problem #2: Mixing services and regular programs invites misbehavior
Second, and more importantly, the issue of security came to the forefront.
As mentioned before, Windows Services and all the programs launched by the first logged-in user would run in the same session (Session 0). But as it turns out, there are serious shortcomings of that architecture!
In “Exploiting design flaws in the Win32 API for privilege escalation”, Kristin Paget showed how a normal user could gain powerful admin rights by exploiting a Windows Service running interactively on his desktop. The attack was straightforward and Paget easily demonstrated how a virus lurking in an untrusted application could gain full access over your PC and create chaos. Ouch!
After initially downplaying the situation, Microsoft admitted that its flagship operating system was vulnerable. They moved quickly to patch it. And sure enough, the next version of Windows (Vista) eliminated the problem.
Microsoft solved both problems by isolating Session 0
The folks in Redmond negated both the interface and security problems in one fell swoop — by locking down access to Session 0. In no subtle terms, they pledged to reserve Session 0 for Windows Services and prohibit users from logging into that protected area.
In a nutshell, there would be no mixing of secure services and regular, potentially insecure applications in the same session. Services would run in Session 0 and user initiated programs would run in Session 1 and higher.
And with isolation in place, all talk of a service showing a UI has been rendered moot because no user would be able to see that UI.
Kudos to Microsoft for addressing both problems in a simple and effective way!
But Microsoft chose not to outlaw interactive services
Despite all the adjustments, it’s important to note that Microsoft didn’t plug the security hole by preventing a Windows Service from creating a UI.
Even though enforcing such a restriction would have disarmed Paget’s shatter attack, it wouldn’t have addressed the root problem — the dangerous mixing of highly privileged services and untrusted programs in the same security context.
It’s clear that if that risky co-mingling was allowed to persist, it would only be a matter of time before unscrupulous characters found another way to break in to powerful services running in the same session. So Microsoft focused on that problem.
Indeed, the engineers realized the truth — that interactive services pose no danger once they’re protected from untrusted code.
Today, Microsoft has no compelling reason to prevent a Windows Service from having a UI
With the security holes plugged and application developers no longer having to wrestle with the complexities that stem from visually interactive services, Microsoft has zero incentive to prevent services from creating UI elements. There is simply no upside for them.
On the other hand there is tremendous downside from shackling services in that way. Without a doubt, many of today’s services would break, thereby causing unnecessary nightmares for Microsoft and the thousands of independent programmers who’ve written services for the platform.
Furthermore:
All the documentation for Win32 GUI functions would need to be updated to signal that they don’t work in services or Session 0;
Programmers would face increasing complexity, forever burdened with having to understand where API functions work and where they don’t;
New API-level error codes would need to be introduced to signal when the new UI restrictions were violated.
In summary, it would be a significant undertaking to prevent services from creating a UI. And to what end?
Yes, Microsoft is far from perfect. The 2024 CrowdStrike outage reminded us of that. But they’re certainly smart enough to avoid intentionally shooting themselves in the foot for no good reason, which crippling Windows Services would surely do.
What is a scheduled restart and how can it help me?
We designed AlwaysUp to run your important programs 24/7, 365 days a year.
However, few Windows applications are built to run continuously for days and weeks. Sure, they start out great at first but soon enough they use up all your RAM, bog down the CPU, stop responding to network requests, or misbehave in some other way. Eventually, they break down.
If you’re lucky, that deterioration takes a long time. Indeed, you probably won’t even notice a slow decline if you routinely close the program before it becomes unusable.
But memory leaks and other imperfections eventually come to the forefront when you leave some programs running for a long time.
Regularly restart your program, to keep it “fresh”
The solution for a leaky program is to restart it every now and then. If you don’t give it a chance to run for too long, it won’t have time to deteriorate and fail.
How do I make AlwaysUp restart my application at a regular time?
To make AlwaysUp restart your application periodically, you have to:
Configure AlwaysUp to stop your program at the desired time, and
Tell AlwaysUp to restart the application whenever it stops.
Here’s how to do that.
Step #1: Configure AlwaysUp to stop your program at the desired time
To stop your application on a schedule, edit your application in AlwaysUp and switch to the Monitor tab. From there, check the Every box to enable the “scheduled stop” functionality:
If you expand the Day drop-down, you’ll see that AlwaysUp can stop and restart your program at different intervals. That includes:
Multiple times per day — every 1, 2, 4, 6, 8 or 12 hours;
Once every day;
Once per week, on the day of your choice.
Choose the period that works for your situation. From what we have seen, many customers favor once per week, with Sunday being the most popular day.
After selecting the period, you should set the time you want AlwaysUp to stop your application. Be sure to pick a time that minimizes disruption for anyone using your application.
Note that for hourly periods, the time is the first time to recycle your application. For example, if you choose to restart every 2 hours and you set the time to 5:00 PM, the first restart will take place at 5 PM, the second at 7 PM and the third at 9 PM. And AlwaysUp will continue that cadence until it’s interrupted.
Next, you can tell AlwaysUp to avoid restarting if your program is busy or someone is using the computer. Just check the But only if the following conditions are met box, choose your metrics and define your thresholds:
And finally, check the Reboot the computer option if you want AlwaysUp to restart the PC. Sometimes that’s necessary if the operating system becomes sluggish or unresponsive over time.
Step #2: Tell AlwaysUp to restart the application whenever it stops
By default, AlwaysUp will restart your application immediately after it stops. Because of that, you may not have to make any changes here.
You can find the setting on the Restart tab:
Once you’ve checked the box at the top, you’re good to go. If it isn’t checked, AlwaysUp will not revive your application after the stop you configured in step 1.
Can you show me a few examples?
Sure!
Example #1: Restart every Sunday at 3 AM
Here’s what it looks like to stop your application once per week, early on Sundays:
Example #2: Restart hourly starting at midnight
If you’re running an unstable program, please accept our sympathies!
In that unfortunate situation, you can have AlwaysUp reset the buggy app every hour, at the top of the hour, like this:
Example #3: Reboot your computer daily at 1 AM
If restarting your application isn’t enough, you can setup an off-hours reboot like this:
What are your best tips for scheduling a restart?
Tip #1: Choose a “quiet” time to restart your application
Stopping and starting your application can be disruptive. What if someone is using the software at the time?
To reduce the chance of interruption, please stop your application at a time when no one is likely to be using it. At a minimum, try to avoid normal business hours. And if you can, confine the drama to the weekend or maintenance window. What time works best for you and your team?
Tip #2: When rebooting, only proceed if no one is logged on
Instead of simply restarting your application, you can choose to reboot the entire PC. But do you really want to do that if someone is logged in? That may result in frustration — and lost work.
So if you’re going to reboot, please consider activating the No one is logged on to the computer condition:
Can you tell our readers a bit about Visual Approvals?
Visual Approvals is dedicated to empowering Australia’s building surveying businesses by simplifying the intricate building approval processes. Our mission is to reduce risk and foster growth within building certification businesses. We envision our software setting new standards of excellence in the building certification and regulatory sectors.
Streamlining approvals through extensive experience
Since our founding in 1998, we have deeply engaged with the building certification industry. From the outset, we have collaborated closely with essential stakeholders like building certifiers, engineers, architects, and town planners. This hands-on experience provided us with invaluable insights and feedback about the building approval process’s complexities and requirements. Leveraging this knowledge, we developed our software to streamline business processes and enhance efficiency.
Simplifying approvals with robust software
The complexity of the building certification process meant our goals were not achieved overnight. However, through continuous industry collaboration and rigorous software testing and refinement, we have succeeded. Today, we proudly offer a comprehensive building approval software solution that streamlines the entire process and equips certifiers with the tools they need to excel.
Committed to meeting industry needs
Our commitment to meeting the evolving demands of the building certification industry drives us to continually engage with industry stakeholders and seek improvement opportunities. Visual Approvals is dedicated to adapting to the changing building approval requirements and regulatory standards across all states and territories, delivering significant efficiency savings to the building and construction industries.
Why does Visual Approvals use AlwaysUp?
Many of our customers rely on Dropbox or OneDrive for their documentation, requiring them to be always operational. AlwaysUp ensures that the tools run continuously, regardless of whether the user is logged in, as long as their machine is turned on.
When a new or existing client opts to use Dropbox or OneDrive for their documentation, we install AlwaysUp to support this requirement.
We’ve been using AlwaysUp for the past ten years, and it has consistently met our needs.
What business problem does AlwaysUp solve?
We needed a solution to ensure that Dropbox or OneDrive were always running, facilitating seamless document transfer between the cloud and the customer’s PC.
To explain a bit more, understand that our customers are constantly on the road performing building inspections. Each person uses an iPad to complete necessary documents which are then copied to the cloud (OneDrive or Dropbox) and shared with the main office. It’s important that those documents are uploaded quickly and seamlessly.
By running AlwaysUp on the PC in the main office, we can rest assured that the documents edited on the iPad will make their way to the customer’s office, even if no one is in the office (or logged on to their main computer).
How many installations do you manage?
We’ve purchased an Unlimited OEM license for AlwaysUp, allowing us to install as many as needed to support our growing client base.
Did you evaluate any competitors of AlwaysUp?
Not really. We started out thinking we’d have to develop our own solution but we decided against that once we found AlwaysUp. We didn’t feel the need to look elsewhere because:
#1: AlwaysUp provides exactly what we need
We were able to install OneDrive and Dropbox in AlwaysUp in minutes. Any software we developed would be doing exactly the same thing — but then we would be responsible for maintaining it ourselves, and that would distract us from our main work.
#2: We received excellent product support
The team at Core Technologies is very attentive. They get back to us promptly whenever we have a question or hit a problem. For example, when Dropbox stopped working as a Windows Service for some of our customers a few years ago, Core Technologies was able to resolve the problems in a few weeks.
What are your favorite features of the software?
The most appreciated feature is its reliability. AlwaysUp keeps Dropbox running smoothly and notifies us if the system stops. While it likely offers more functionalities than we use, the features we rely on are stable and dependable.
Any other comments?
Working with Core Technologies has been a great experience. Their support team is responsive and helpful. We would highly recommend AlwaysUp to others needing a solution for continuous program operation.
In particular, AlwaysUp has been crucial for our iPad app, which uploads and downloads documents to and from Dropbox or OneDrive. The continuous availability ensured by AlwaysUp allows our clients to sync documents at any time, day or night, enhancing the overall solution we provide.
Are you having a problem running OneDrive as a service with AlwaysUp? Perhaps OneDrive.exe is running but your files aren’t being synchronized with the cloud?
We know that troubleshooting OneDrive in the isolated Session 0 can be difficult. Even if OneDrive is trying to tell you what’s wrong by displaying a helpful error message, you can’t see it.
OneDrive writes encrypted log files for “internal” use
On our quest to provide excellent support for running OneDrive 24/7, we were happy to discover that OneDrive systematically writes log files describing what it’s doing. And those files are quite detailed!
But before you start to celebrate like we did, the reality is that the logs are in a proprietary, undocumented binary format. They’re intended for Microsoft engineers — not mere mortals like you and me.
Fortunately though, that’s not the end of the story.
We can decode OneDrive’s encrypted log files
Even though OneDrive’s log files are encrypted, Yogesh Khatri’s OneDrive ODL reader can parse them. That free python script will run through a log file and produce a readable CSV file.
Yet even after decoding them, the log entries remain cryptic and difficult to understand. As we mentioned before, that’s because the contents are meant to be analyzed by the software engineers who support OneDrive.
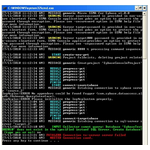
For example, here’s what a decoded log file looks like:
As you can see, the lines aren’t particularly revealing!
In any case, we’ve found that the decoded logs can sometimes provide interesting clues that lead us in the right direction. They’re better than nothing, which is why we encourage you to send them to us for analysis.
How to send us your OneDrive log files
Basically, you’ll zip your OneDrive log folder and email it to us.
To do so, step by step:
Open File Explorer
Navigate to the folder where OneDrive stores its logs. It’ll probably be
On the other hand, if you’re running OneDrive with your personal account, you’ll have a subfolder named Personal, as pictured here:
Copy your subfolder (Business1 or Personal) to a temporary location. We don’t want to disturb OneDrive.
In the copied folder, remove all files with the .odlsent, .odlgz or .loggz extensions last modified more than 24 hours ago. There may be quite a few, going back days or weeks.
Once you’ve deleted those older files, you’ll be left with the recent activity and a few supporting files. For instance, we had 24 files on our machine after cleaning up:
Zip (compress) the folder. Afterwards, you can delete the folder.
Email the zip file to our support team (at support@CoreTechnologies.com). We recommend including your OneDrive diagnostics in the email, to tell us how OneDrive is configured on your computer.
That’s it. We’ll do our best to analyze your OneDrive log files and get back to you soon. Wish us luck! 🍀🤞
Have you ever been on a cruise or ferry? If so, there’s a good chance that your arrangements were processed by Versonix — an innovative Silicon Valley company supporting the travel industry for over three decades.
Versonix started using AlwaysUp way back in 2012.
Why does Versonix use AlwaysUp?
At Versonix, we’ve developed several proprietary Windows executables and Java programs to support Seaware — our market-leading cruise reservation system that processes 20 million bookings each year. And over time, AlwaysUp has grown to become an integral part of our day-to-day operations.
Most notably, AlwaysUp helps our business achieve the following:
100% uptime for important software
We install all our applications with AlwaysUp, to ensure that they are constantly up and running. The fact is that we can’t tolerate downtime, and we’ve largely eliminated that by using AlwaysUp.
Centralized application management
In the past, it was tricky to manage hundreds of programs serving dozens of environments across multiple servers. Our engineers were constantly fighting with RDP, Task Manager, the NET command and other Windows utilities.
But that’s all changed. By using AlwaysUp web service, we were able to connect our applications to a central, browser-based dashboard. And from there, we can stop, start or restart our any of our applications with a few clicks. It’s a very convenient solution — made possible by AlwaysUp!
What did you use before AlwaysUp?
We tried Microsoft’s free Srvany tool a few years ago. While it worked fine for making one application into a Windows Service, it’s quite impractical when you need to install hundreds. Furthermore, the lack of a GUI was a major shortcoming.
What are your favorite features of the software?
Beyond the basic “keep everything running 24/7” feature, our team relies on:
The Web Service API
By calling the AlwaysUp REST web services API, our middleware can stop, start or restart our applications programmatically. That flexible capability let’s us integrate AlwaysUp into our software development lifecycle, efficiently attending to maintenance tasks, software upgrades and more.
Tags
We tag each of our applications with the customer and environment it serves. We do that because it allows us to manage a set of related applications as a unit — both from AlwaysUp and from our web dashboard.
For example, we can easily stop all the executables supporting the QA environment because they’re tagged with “GRP_QA” in AlwaysUp. Without that grouping, we’d have to stop each application individually — a tedious process.
Any other comments?
Core Technologies has provided excellent support over the years. Whenever we’ve had a problem, you’ve jumped in quickly to resolve the issue. We really appreciate that professional response as we strive to support our own customers too.
We also appreciate the responsiveness of your development team. Even though your typical user isn’t running hundreds of applications like us, you’ve implemented several of our suggestions that make it easier to run the way that we do. Thanks for your help!

")
")


")
")
")
")
")
")
")
")
")


")
")
")