The Core Technologies Blog

Professional Software for Windows Services / 24×7 Operation


Essential Windows Services: Spooler

Print Spooler

What is the Spooler service?

The Windows Print Spooler is a key operating system component that manages all printing on your computer. It is started when your PC boots and runs unattended, 24×7 as a Windows Service.

The Windows Service is named Spooler and its display name is Print Spooler. The service runs inside a process called spoolsv.exe:

Spooler Windows Service

The Spooler:

  • Runs silently in the background

  • The Spooler does not show any windows or tray icons. It is an invisible technical component that presents an Application Programming Interface (API) to programs looking to manage printing.

  • Accepts files to be printed, from all applications

  • The Spooler is always listening for print requests. It accepts documents from any application running on your computer.

    The process of handing off a document to the Spooler is called Spooling. Once an application is done spooling a document, the Spooler is responsible for the actual printing. The application can go back to its normal tasks.

    For example, let’s say you’re printing a spreadsheet from Microsoft Excel. You will notice a brief period as Excel prepares the document and hands off the print request to the Spooler. And during that time, a helpful window will announce that Excel is printing. However Excel is really sending the spreadsheet to the Spooler (i.e. spooling):

    Excel printing/spooling

    After the window has disappeared (i.e. Excel is done spooling), you will be free to edit your spreadsheet while the actual printing proceeds simultaneously. You can even close Excel! None of that matters to the Spooler, which will ensure that your spreadsheet makes it to the printer — independent of Excel.

  • Facilitates concurrent printing

  • Ever printed several, lengthy documents at the same time? The Spooler makes that possible — without overwhelming your printers.

    The Spooler maintains a queue of requests (a print queue) for each printer on your computer. When you print a document, the Spooler:

    • Adds a new item (a print job) to the print queue.
    • Sends the print job to the printer (when the printer is ready).
    • Monitors the printer as it produces pages.
    • Removes the job from the queue once the printer has produced all pages.

    Windows allows you to see (and manage) each printer’s queue. To open a print queue:

    1. Open the Control Panel (available from the Start menu).

    2. Type the word printers into the search box and click the View devices and printers link on the left:

      Find printers in Control Panel
    3. Find your printer in the list. Right click the printer and select See what’s printing from the menu:

      Select see what's printing
    4. A window showing all pending print jobs will come up. Here we see one item for Administrator — a text file printed from the Notepad application:

      The print queue window

      From there, you can cancel all print jobs (“clear the queue”), pause a specific job or stop printing altogether.

  • Will do everything in its power to ensure that documents are printed

  • The Spooler’s mission is to make sure that all your documents are printed — even if there is a brief outage or interruption.

    For example, if your printer temporarily disappears from the network, the Spooler will wait a reasonable time for the device to come back before declaring a failure.

    And if your request to print a single page is stuck behind a 200-page behemoth, the Spooler will ensure that your document gets its turn, eventually.

What happens if I stop the Spooler service?

Nothing can be printed when the Spooler service is stopped. And if you try to print without the service running, Windows will insist that no printers are installed:

No printers when Spooler is stopped

Indeed, when the service is running, printers show up as ready and waiting. Printing works fine:

Spooler service running, printers connected

But all printers become inaccessible the instant the service is stopped:

Spooler service stopped, printers not connected

Is it safe to disable the Spooler service?

If you don’t have any physical printers attached to your computer and you and never plan to do any printing, you can safely disable the Spooler service.

However, watch out for applications that silently use the printing API. They will also fail when the service is disabled.

What should I do if the Spooler service isn’t working?

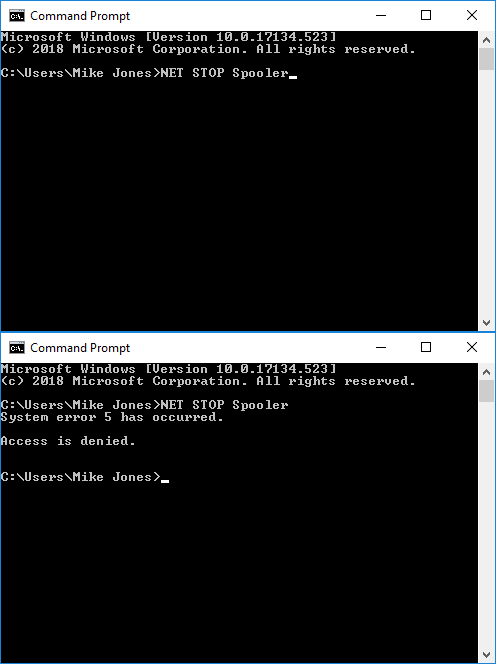
If the Spooler is misbehaving, you should restart it. You can do so from the Services Control Panel application, or by running a couple of NET commands:

NET STOP Spooler
NET START Spooler

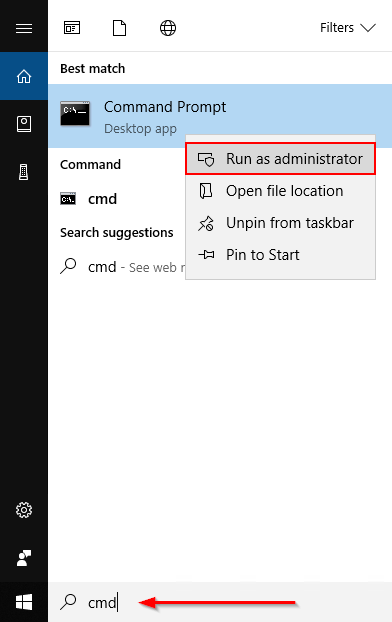
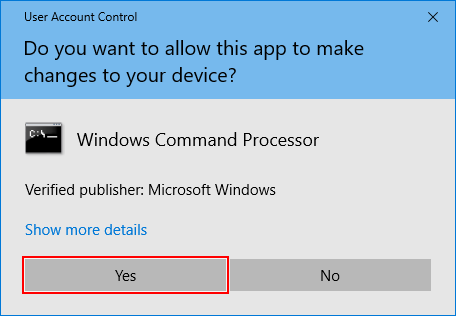
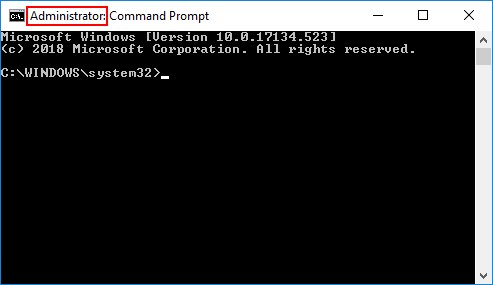
Be sure to run those commands from an elevated command prompt, otherwise they will fail with permissions errors.

I made a mistake. How do I cancel all printing?

To clear all printing, open the printer queue (see above) and select Cancel All Documents from the Printer menu:.

Select Cancel All Documents

Give the Spooler (and your printer) a few seconds to respond to the request.

Canceling didn’t work. Is there another way to clear out all pending documents?

Try running this sequence of commands to stop the Spooler, remove all files from the print queue, and restart the service. You will need to have admin rights:

NET STOP Spooler
DEL /Q /F /S C:\Windows\System32\spool\PRINTERS\*
NET START Spooler

The Spooler service won’t start (Error 1053)

As reported in Microsoft’s technical forum, the problem may be with “desktop interaction” — an obscure windows service setting.

To fix the issue:

  1. Open the Spooler service (from the Services Control Panel application)
  2. Switch to the Log On tab
  3. Un-check the Allow service to interact with desktop box:
    Un-check interact with desktop
  4. Click OK to save your change.

Afterwards, you should be able to start the service.

The Spooler service is stuck in the “Stopping” state — Help!

In that unusual situation, find and terminate the spoolsv.exe process from the Task Manager (admin rights required):

Task Manager: Terminate spoolsv.exe

The service should transition to the stopped state.

The Spooler service keeps stopping for no reason. How do I keep it running?

Our Service Protector utility may be able to help. Please follow this step-by-step tutorial showing how to protect the Spooler service.

Questions? Problems?

If you would like to know more about the Windows Print Spooler service, or you have a specific problem, please feel free to get in touch. We will do our best to help you!

Posted in Windows Services | Tagged , , , , , | 3 Comments

Q & A: How do I Restart my Application/Service Regularly from AlwaysUp?

Q & A - Restart Application
  We are currently using AlwaysUp with several executable instances. We need to have these restarted daily due to memory leaks from the application.

I don’t see a scheduling restart option in AlwaysUp. I think this could be done through a windows task but I see that these are being run as windows services. Would you recommend doing this as a windows task or would the Service Protector be a better option?

— Kevan Hauver, AAA Northeast

Hi Kevan. Sorry to hear of the awful memory leaks!

Yes, Service Protector could help your situation but there is no need to purchase that additional software. Here are a couple of options to restart your application periodically:

Restart once daily (via the Monitor tab)

AlwaysUp makes it very easy to restart your application once per day, at a time of your choosing. Edit your application in AlwaysUp and look for the Every setting on the Monitor tab.

Here is what the Monitor tab looks like when configured to restart the program every day at 2 AM (a time when the software/server is likely to be “quiet”):

Restart every day at 2 AM

Note that AlwaysUp can restart conditionally — only when one or more conditions are met. For example, to avoid restarting when the software is busy, check the It has been idle for at least box and fill in an appropriate duration.

And if you find that simply restarting the application doesn’t clear the problem, you can try rebooting the entire machine. That option is available at the bottom of the form.

Update May 2019: AlwaysUp version 11.8 added the ability to restart your application many times per day — every 2, 4, 6, 8 or 12 hours. You can still use the Task Scheduler as described below, but the new options (available on the Monitor tab) will be more convenient.

Restart multiple times per day (using the Windows Task Scheduler)

If restarting once per day is not enough, you have my sympathies!

For that situation, we recommend creating a simple script that will restart your service and then enlisting the Windows Task Scheduler to restart the service as often as you like. Follow these steps, which you should be able to complete in 10 minutes or less:

Step 1: Create a batch file to restart your AlwaysUp service

First, please create a batch file that restarts your AlwaysUp service. It will contain two lines — one to stop the service and another to start it.

For example, if your AlwaysUp application is named “Dropbox”, your batch file should contain the following calls to the Windows NET command:

  NET STOP "Dropbox (Managed by AlwaysUpService)"
  NET START "Dropbox (Managed by AlwaysUpService)"

The ” (Managed by AlwaysUpService)” portion is a necessary part of the service’s name. All services created by AlwaysUp feature that suffix.

Note: The batch file may not work as expected if it takes your application longer than 30 seconds to shut down. This is because NET STOP will only wait for 30 seconds before giving up. And if it does give up, the subsequent call to NET START will fail too. So after running the batch file, the AlwaysUp service may end up in the “Stopped” state — not what you want for your 24/7 application!

For slow applications, we recommend using our free ServicePilot utility instead of NET. ServicePilot can be configured to wait much longer than 30 seconds for the service to stop.

Assuming that you have downloaded and saved ServicePilot to your AlwaysUp folder, here is what the batch file looks like with ServicePilot instead:

  "C:\Program Files (x86)\AlwaysUp\ServicePilot.exe" -restart -wait 300 "Dropbox (Managed by AlwaysUpService)"

That command will wait for up to 300 seconds (5 minutes) for the service to restart.

Give the batch file a meaningful name and save it to your AlwaysUp folder (C:\Program Files (x86)\AlwaysUp). We’ll need its full path in the next step.

Step 2: Setup the Task Scheduler to run the batch file

Here’s how to run the batch file (and restart your application) every day at noon.

  1. Start Task Scheduler. This is best done by running taskschd.msc from a command prompt, or by opening the Control Panel, searching for “schedule” and clicking the Schedule tasks link:

    Start Task Scheduler
  2. Once the Task Scheduler window appears, select Create Basic Task on the left:

    Task Scheduler: Create Basic Task
  3. In the Create Basic Task Wizard window, enter a suitable name. You can leave the description blank.

    Enter a name for the task

    Click Next to proceed.

  4. The Daily option (which we want) should already be selected, so click Next to move to the next screen:

    Run the task daily
  5. Here you specify the time to restart the service/application. We have selected today at noon but you should select whatever time works for you.

    Leave Recur every at 1 day and click Next when you are ready to proceed.

    Specify the time to restart the application
  6. We want to start a program (the default), so click Next to move on:

    Start a program
  7. Click the Browse button and choose the batch file you created in the previous step. Recall that we placed ours in the AlwaysUp folder (C:\Program Files (x86)\AlwaysUp):

    Select the batch file you created

    Click Next to proceed.

  8. The basic configuration is now complete and you will see a summary of the scheduled task to be created.

    Check the Open the Properties dialog… box and click the Finish button:

    Task summary
  9. And on this final screen, select the Run whether user is logged in or not option and check the Run with highest privileges box. These are required by Windows to manipulate the service on your behalf.

    Set task security

    Click OK to wrap up. (On some versions of Windows, you will have to enter the password for your account on the way out.)

  10. Your task is now fully configured. Navigate into the Task Scheduler Library on the left and confirm that all is well:

    Daily restart task configured

With this new task in place, Windows will automatically restart the AlwaysUp service every day at noon.

Step 3: Repeat the process to configure additional restarts

Want to restart again at 2 PM? Simply repeat the process to create another task but select 2 PM instead of noon.

Advanced users can save a few clicks by exporting the task to a XML file, updating the file to specify a different time, and importing the modified XML to create a new task.

Hopefully you don’t have to create too many tasks…

Best of luck with your application!

Posted in AlwaysUp | Tagged , , , , | Leave a comment

Q & A: Can my CAE/Visio Application Run Properly as a Windows Service?

Q & A - Computer Aided Engineering Application
  I must run a Computer Aided Engineering (CAE) application as a service but it doesn’t work with AlwaysUp. I guess that Visio is the problem because the startup phase of the tool runs up to the Visio initialization (via COM) and then hangs. When I try to register Visio standalone, it’s also not working.

Any idea what I can do to isolate the problem?

— Rüdiger Lange, AUCOTEC

Hi Rüdiger. You are likely running into a couple of problems. Here are our recommendations to resolve the issues:

Specify the correct Windows account in AlwaysUp

Your CAE application needs to run in the Windows account where Visio was installed. If not, your tool will fail when it tries to start Visio.

You see, when you installed and configured Visio, it saved several settings in your account. Those settings are not accessible to other users of the computer.

Even if another user found and launched the Visio executable, Visio would start, but it may come up “blank”. Whatever settings you provided at installation (and any changes you subsequently made while using Visio) may not be visible.

So please enter the user name and password of your Visio Windows account on the Logon tab to have AlwaysUp start your CAE application in that account. For example, here we have configured the “Administrator” account:

Specify the account for Visio

Start Visio as a Windows Service too

AlwaysUp will run your CAE application in the background, in the isolated Session 0. Now because COM components cannot communicate easily across login sessions, Visio must run in the same session. Therefore, you should also launch Visio as a Windows Service with AlwaysUp.

We don’t have a tutorial for Visio but setup should be the same as for any application in the Microsoft Office suite. Here are the guides for:

But please be aware of the following cautionary note from Microsoft for when running an Office program as a Windows Service:

All current versions of Microsoft Office were designed, tested, and configured to run as end-user products on a client workstation. They assume an interactive desktop and user profile. They do not provide the level of reentrancy or security that is necessary to meet the needs of server-side components that are designed to run unattended.

Microsoft does not currently recommend, and does not support, Automation of Microsoft Office applications from any unattended, non-interactive client application or component (including ASP, ASP.NET, DCOM, and NT Services), because Office may exhibit unstable behavior and/or deadlock when Office is run in this environment.

If you are building a solution that runs in a server-side context, you should try to use components that have been made safe for unattended execution. Or, you should try to find alternatives that allow at least part of the code to run client-side. If you use an Office application from a server-side solution, the application will lack many of the necessary capabilities to run successfully. Additionally, you will be taking risks with the stability of your overall solution.

That sounds pretty bad, right? However, in our experience, there is a large subset of Office features that work perfectly fine unattended.

However please heed the Redmond warning and test thoroughly, to make sure that your automation functions as expected in the background in Session 0. We will be here to help you if you run into any trouble!

Posted in AlwaysUp | Tagged , , , , , , | Leave a comment

AlwaysUp 11.5: Improvements for Session 0 Isolation, Server 2019, and more

Check out what's new in AlwaysUp 11.5

AlwaysUp version 11.5 is now available for download!

This release delivers a handful of important changes, along with the usual under-the-hood refinements.

“Switch to Session 0” removed when it’s not supported

As you may have noticed, Microsoft has crippled access to Session 0 in Windows 10 Build 1803 and later. And even though the writing had been on the wall for some time, we were still disappointed to see that convenient functionality removed from Windows. 🙁

But we live in Microsoft’s world, and we must react to their dictates as best we can.

So going forward, AlwaysUp will scan the operating system and determine if Session 0 is accessible or not. If it’s not, then:

  • The Switch to Session 0 toolbar button will be hidden:

    Switch to Session 0 Toolbar Button Removed

  • The Switch to Session 0 menu entry (found under the Tools menu) will be removed:

    Switch to Session 0 Menu Entry Removed

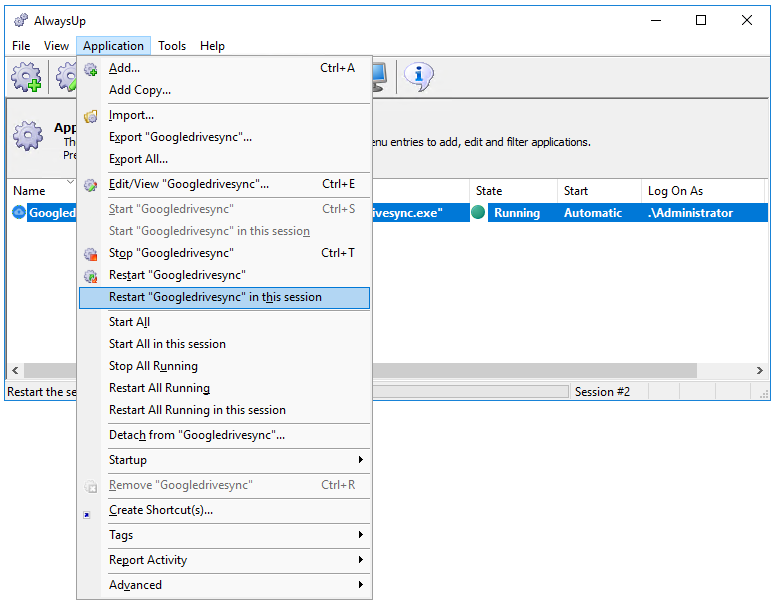
Note that your application will continue to run properly as a Windows Service in the isolated Session 0 — you just can’t see it there. You can always select Application > Restart in this session from the menu to bring your program visibly onto your desktop.

View & set Windows Service “Read” permissions

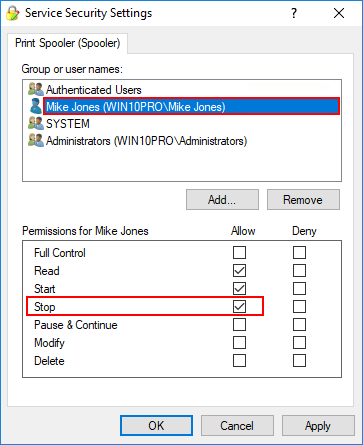
While AlwaysUp would allow you to set who can start, stop or modify each Windows Service it creates, the interface could not show (or grant) someone the ability to simply read the service. This shortcoming was recently addressed in Service Security Editor and we have now done the same in AlwaysUp.

Select Application > Advanced > Service Security Settings to interact with the new “Read” element:

View/Set Service Read Permissions

Technical enhancements for Windows Server 2019

Windows Server 2019 was released in October (and re-released in November after some disturbing technical glitches were addressed). AlwaysUp version 11.5 includes minor technical tweaks to ensure smooth, 24/7 operation of your Windows Services on Server 2019.

You can rest assured that AlwaysUp is fully compatible with the new OS.

Small Improvements for Windows Server 2019

Other fixes & improvements

  • Improved support for the latest builds of Windows 10 and Windows Server 2016. Each major update was thoroughly tested and no issues were found.

  • The registration window now displays the version number — to help customers complete registration on the correct version of the software.

  • The registration process provides additional labels and informative pop-up messages to help customers complete the process without incident.

  • The enhanced “Help” menu includes a link to our Blog and a link to an article describing how to report problems.

  • When AlwaysUp is running in evaluation mode, the title of the main window now mentions when the 30-day trial will expire.

As usual, please review the release notes for the full list of features, fixes and improvements included in this release.

Upgrading to AlwaysUp Version 11.5

If you purchased AlwaysUp version 10 (after January 2017) you can upgrade to version 11.5 for free. Just download and install “over the top” to preserve your existing applications and all settings. Your registration code will continue to work.

If you bought AlwaysUp version 9 or earlier (before January 2017), you will need to upgrade to use version 11.5. Please purchase upgrades here — at a 50% discount.

See the full upgrade policy for additional details.

Enjoy!

Posted in AlwaysUp | Tagged , , , , , | 1 Comment

Why should I Pay for AlwaysUp when Free Alternatives are Available?

Every now and then, someone reviewing our AlwaysUp software declares it “too expensive”. They ask: “Since I can find free tools (like Microsoft’s Srvany) to run my application as a Windows Service, why in the world would I spend $50 on your software?”

Sure, not everyone looking to run a program as a service needs AlwaysUp. A free tool can be a fine choice, especially for hobbyists and home users.

But if you are a professional working in a commercial environment, please be sure to answer these five questions before making a commitment:

1. Where will you go for help if you have questions (or things go wrong)?

The wonderful world of Windows Services can be tricky to navigate. Technical obstacles (like Session 0 Isolation) abound.

As a professional, you owe it to your business to plan for all eventualities.

Tech Support when you need it
  • Is there a phone number to call when you or your team needs urgent help?
  • How about a support email with a 24-48 hour response time?
  • Can you easily find online FAQ’s and other helpful resources?

At minimum, please make sure you have a contact!

2. How much of your own time will you have to spend on the “free” solution?

The cost of an item is usually more than its initial, sticker price. We often underestimate true, long-term cost because we forget to add our time to the equation.

For example, say you want to buy a new computer desk. Which is cheaper?

  1. A ready-to-go desk for $199
  2. The same desk from Ikea for $149

It’s a no-brainer, right? #2 is the way to go.

But what if it’s going to take you a couple of hours to unbox and assemble the Ikea furniture? Does option #1 (which avoids that extra labor) seem the more cost effective choice now?

Spend money to save time

Similarly, a free alternative to AlwaysUp definitely saves a few bucks at first.

But once you have the free software, how much of your valuable time must you devote to installation, troubleshooting and support? Might those ongoing costs dominate the equation?

We realize that your time is important. And we designed AlwaysUp to save you time — initially and over the many months and years you will use the product.

For example:

How much is your time worth?

3. Are you willing to take on the additional risk?

When you use unsupported software in your business, you become responsible for it when it fails. The buck stops with you.

At your own risk

Are you willing to assume that risk? To accept blame from your boss/team if the software misbehaves or becomes unusable after a Windows update?

Realize that your reputation (and perhaps your job) may be at stake, especially if you are operating a mission-critical system!

4. Are you sure you won’t need AlwaysUp’s extra features?

With over a decade of real-world use, AlwaysUp has evolved to include a ton of features — many of which are not found in free alternatives.

AlwaysUp is feature-rich

For example, AlwaysUp can:

  • Automatically restart your application if it crashes, hangs, or uses too much CPU
  • Send you an email when your application stops;
  • Boost your application’s priority, to make it run faster;
  • Capture your application’s output to a text file;
  • Send you a weekly report showing how your application is performing.

Check out this PDF flyer comparing AlwaysUp and Srvany for more:

AlwaysUp vs. Srvany (PDF)

As many customers have discovered, these extra features can come in very handy down the road!

5. How important is security?

Needless to say, you should be very careful when introducing new software into your secure environment.

AlwaysUp is digitally signed, so you can be positive that it is from our reputable company:

AlwaysUp is Digitally Signed

In addition, AlwaysUp has been evaluated by the US Department of Commerce Bureau of Industry and Security and has earned an export classification of EAR99:

AlwaysUp ECCN (PDF)

Can you say the same for the free software?

Posted in AlwaysUp | Tagged , , , | Leave a comment