Posted onFebruary 14, 2018 (Revised January 7, 2023)
We are currently using AlwaysUp for one of our customers to run Dropbox (inside a terminal server). Lately we have been having an issue where items stop syncing to Dropbox however AlwaysUp says the state is running. In order to get this working again we need to restart the Dropbox service using AlwaysUp. Any support would be appreciated.
Hi Fulton. Based on what we have seen with other customers, these are the likely culprits:
Dropbox is automatically upgrading itself
Dropbox is designed to automatically download and install new versions of itself. This feature does a great job of keeping your software up to date (applying necessary security patches as soon as possible), but it can lead to unexpected behavior when running in a 24×7 environment. What happens if something goes wrong? Suppose there is a “bad build”? And how do we prevent AlwaysUp from launching new copies of Dropbox as it goes up and down while the update is being applied?
This article on Dropbox auto-updates describes a solution. Please review and apply the recommended settings to avoid interruption in the face of automatic updates.
Your Dropbox folder was temporarily inaccessible
Dropbox will stop dead in its tracks if it is unable to access the folder holding shared files. It may throw up a message like this:
Is your Dropbox folder on a network drive? Perhaps there was a problem getting to the network as your machine booted. If that is the case, we recommend setting Dropbox to startup Automatically, but shortly after the computer boots. This will give critical services an extra 1-2 minutes to properly initialize before the software tries to access your network folder.
Dropbox is running into another transient problem
Problems are not limited to network drives. There are a host of other reasons why Dropbox will fail to start properly. These include:
In these situations, Dropbox may be trying to tell you what is wrong. But because it is running in the background as a windows service, you will not see any error popups on your desktop.
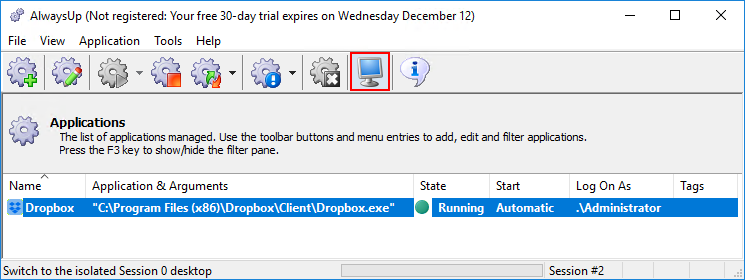
When you discover that Dropbox isn’t working, try switching to Session 0 to see if Dropbox is showing an error message:
A helpful error message may indicate how to resolve the problem.
Please be sure to get in touch if none of these tips help your situation!
I’m using ncrack to monitor our network. I recently started running it as a windows service under AlwaysUp. Everything is working perfectly except that sometimes ncrack stops capturing traffic. The CPU goes to zero and nothing else is written to the log files. Is there some way to get AlwaysUp to terminate ncrack and start a fresh instance?
— Michael
Hi Michael. AlwaysUp doesn’t have an “idle CPU” monitor built in, but you can use a Sanity Check Plugin to solve your problem.
What is a “Sanity Check Plugin” you ask?
The Sanity Check feature allows AlwaysUp to detect arbitrary problems with your application running as a windows service. At its heart is a special plugin (a script or executable) that informs AlwaysUp when decisive action — such as restarting your application or rebooting the machine — is necessary. Dig into the technical details at the Sanity Check page.
Our pre-configured CheckForCPUActivity plugin will empower AlwaysUp to restart ncrack if it sits idle for too long. Here is how to set it up:
First, make sure that you have AlwaysUp version 10.2 or later on your machine. That release (from June 2017) introduced important enhancements to the Sanity Check feature.
Select Help > About AlwaysUp… to check what version of AlwaysUp you have installed:
Next, download the CheckForCPUActivity utility from our web site. Save it in your AlwaysUp installation folder, usually C:\Program Files (x86)\AlwaysUp\
Edit your application in AlwaysUp.
Switch to the Monitor tab. Check the Whenever it fails a “sanity check” box and click the triple-dots button:
Working with the “Configure Sanity Check” window that comes up:
In the Run field, enter the following command line:
This will check ncrack for any CPU activity over 60 seconds.
Using the Every controls, specify how often AlwaysUp should inspect ncrack. Every 10 minutes should be sufficient but feel free to tune as you like.
Click the OK button.
And finally, click the Save >> button to record your changes.
With these settings in place, AlwaysUp will launch CheckForCPUActivity every 10 minutes. Each run will watch ncrack for 60 seconds and if no CPU activity is detected over that period, AlwaysUp will restart ncrack.
A note to other customers: This approach will work with any application where minimal CPU usage indicates a failure. The solution presented is not specific to ncrack.
Posted onJanuary 6, 2018 (Revised September 28, 2020)
Hello, I’m testing your Service Protector program and I was wondering if it starts automatically when my server reboots? I didn’t notice an option for that. I have my server restart every night, will this be an issue with the trial version?
— James
Hi James. Yes, Service Protector will automatically start to protect your service whenever your server reboots. Restarting your server every night will not pose a problem.
You can’t find an option to automatically restart because there isn’t one! That functionality is built in. And the desktop application you run to setup your windows service will not start because it doesn’t need to. Confused? Let me explain…
You see, Service Protector has a couple of parts:
The desktop application you run to configure your windows services
When you install Service Protector, a convenient shortcut will be created on your desktop:
Double-clicking that shortcut will launch Service Protector:
But this application is merely a management utility, a “waiter/waitress” in the restaurant.
You use this management utility to:
choose the windows service you wish to keep running 24/7
specify the options for monitoring the service
view daily and weekly performance reports, and more
This GUI utility does not monitor your services (or do any cooking, if we keep the restaurant analogy going). Therefore it does not need to start when your computer boots. You run it on demand, whenever you need to interact with Service Protector.
An invisible/background component that babysits each of your windows services
Whenever you setup a service to be monitored (like the Print Spooler in the screenshot above), a background program is deployed to do the work. That program is completely invisible and the only way to see it is by using the Windows Task Manager (or a relative, like the excellent Process Explorer).
Look for ServiceProtectorAgent.exe. Here it is watching the Print Spooler on Windows Server 2016:
Note that this component is itself a windows service! If your service is named “Spooler”, you will find a new service called “ServiceProtector: Spooler” on your machine:
The service’s startup type will be “Automatic”, to ensure that the Agent starts as soon as your machine boots. You never have to start it yourself.
So to complete the analogy, this background component is the restaurant chef — busy in the kitchen cooking the meals submitted by the waiter/waitress.
Hopefully it makes sense now! Please let us know if not. But the bottom line is that we’ve got you covered. 🙂
We have installed AlwaysUp version 9.7.2.88 (Sep. 2 2016) on Windows Server 2012 R2 Standard. We have multiple jobs that run a 64-bit .NET Console Application as a windows service, but we keep getting a SystemOutMemoryException error. What we found watching the Task Manager is that the EXE always runs as 32-bit. How do we get AlwaysUp to run the console app as 64-bit?
— Clayton
Hi Clayton. There are a couple of ways to force your .NET application to run in 64-bit mode:
Build a 64-Bit .NET Version
If you use Microsoft’s Visual Studio, the build configuration is likely be set to Any CPU (the default):
This will produce an executable that will run in either 32-bit or 64-bit mode, depending on the version of .NET available.
To run your executable in 64-bit only, change the configuration to x64 and rebuild.
If your project doesn’t have a x64 configuration, create one like this:
Select Build > Configuration Manager…
In the Configuration Manager,
click the Active solution platform entry and select <New> from the menu that appears:
In the New Solution Platform window, choose x64 in the top box. We recommend copying settings from Any CPU and creating new project platforms (the default):
Click the OK button to record your changes. Close the Configuration Manager
You should now have x64 as a build option. Set it and recompile to produce a 64-bit only executable:
Use CorFlags to Force .NET 64-Bit
If your application is built with “Any CPU” but you can’t rebuild it in Visual Studio, Microsoft’s free CorFlags utility will come to the rescue.
Corflags.exe is distributed with the Windows 10 SDK. Be sure to select the “.NET Development Tools” component when installing.
We actually found the CorFlags exe file in a couple of places on our hard drive:
You may find CorFlags in older .NET SDK installations as well — it has been around since the release of .NET 2.0 (2005).
Once you have located CorFlags:
Make a copy of the executable you want to run in 64-bit. The application we used for testing is called SystemInfoDotNet.exe, so we copied it to SystemInfoDotNet64.exe.
Open a command prompt with admin rights.
CD to the folder containing the copied application.
Run CorFlags on the copied application file. Specify the /32BIT- option to strip away the ability to run in 32-bit mode:
The copied executable will always run in 64-bit mode.
For example, our SystemInfoDotNet utility — which displays basic process and system information — normally runs in 32-bit mode:
But after running CorFlags on SystemInfoDotNet64, it magically runs in 64-bit mode:
Occasionally the application we’re running as a service stops responding, resulting in AlwaysUp restarting it. We would like to run a script prior to the restart to try to generate a crash-dump file so we can find out where the problem is. Is that possible?
ProcDump — yet another excellent utility from the Sysinternals team — easily creates a dump file from any running process. It is our tool of choice when exploring application crashes.
Download the ProcDump .Zip package and extract all files to a convenient location. We have placed the files in “C:\Apps\ProcDump” for this article.
Be sure to run ProcDump at least once and accept the Sysinternals EULA. We don’t want the utility to hang when we run it unattended as a background service!
Compose the command line to capture a crash dump when your application stops
ProcDump features an impressive set of command line options. Please review and identify the flags that work best for your situation.
For example, we use this command to dump the notepad.exe application whenever it stops running:
c:\Apps\ProcDump\procdump.exe -t notepad
Please ensure that this command works as expected. Start your application, run the command and then terminate your application. Is a dump file created? Troubleshot and fix if not.
Setup your ProcDump command as a Windows Service in AlwaysUp
Your application is running 24×7. To configure ProcDump to operate on the same schedule and capture the dump file at any time:
Start AlwaysUp and select Application > Add… to bring up the Add Application window.
On the General tab:
In the Name field, enter a suitable name for this new service. We have used “ProcDump Notepad”.
In the Application field, enter the full path to ProcDump.exe.
In the Arguments field, provide the command line options you developed in step 2. Be sure to add the -w flag, which will cause ProcDump to wait for your app to launch if necessary.
And in the Start in directory field, enter the folder where you want the dump files to be written. (Leaving this blank will cause dump files to be created in the ProcDump folder.)
On the Logon tab, specify your windows account. ProcDump should run in this account since you know it works there (and that the EULA has been accepted).
Click the Save >> button to record the ProcDump service.
And finally, start your new service (from the Application menu).
Here is what the finished setup looks like for us, with Notepad running as a service and ProcDump monitoring it (also as a service):
Test
Now that everything is in place, you should confirm that a crash dump will be created whenever your application stops.
Open the Task Manager and kill your application. Does a new dump file appear in the expected location? If not, please review all the steps and ensure that nothing was missed.