What is automatic logon? Why would I use it?
Automatic logon — also known as an auto logon — is feature where Windows automatically signs you in at boot. It’s largely viewed as a convenience, but it can improve the uptime of your important applications as well.
To understand why you may want to setup auto logon, let’s dig into the Windows boot process.
Windows starts your programs only after you log in
When you turn on your computer, Windows:
Initializes itself and its devices (keyboard, mouse, etc.);
Starts important Windows Services (to support networking, security, and other key functionality);
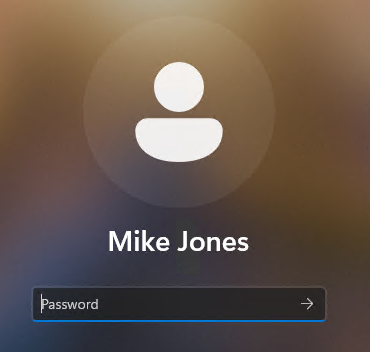
Displays a login screen and waits for you to enter your user name and password:
That’s it. If you never log on, nothing else happens. Most significantly, Windows doesn’t start any of your programs.
Why might that be a problem?
If you’ve got software that should be running all the time, the Windows boot process presents a complication.
To illustrate, suppose you’ve got a media sharing program running on your desktop. It’s serving your catalog of movies to the other devices on your home network. At this point, the software is working well and your kids are happily streaming content to their tablets.
Suddenly, a power fluctuation causes your PC to shut off. But not to worry — the power soon resumes and your computer comes back to life after a brief interruption.
However, even though your PC restarted automatically, it will be stuck at the login screen, waiting for you to sign in. Your media sharing program won’t start and your family won’t be able to access your catalog of movies. Bummer!
Automatic logon enables your programs to start at boot
With auto logon enabled, Windows behaves differently at boot. Instead, Windows:
Initializes itself and its devices (keyboard, mouse, etc.);
Starts important Windows Services (to support networking, security, and other key functionality);
Automatically signs you into your account;
Loads your desktop and launches all programs set to start at sign-in.
As a result, when you walk up to your PC, you don’t see a login screen. Instead, you see your desktop — with all your startup programs running.
The effect is that all your programs set to start at sign-in (i.e. the ones in your “startup folder”) will run whenever your computer boots.
Automatic logon can save time too
In certain environments, it can be an annoyance having to log in each time your computer restarts. If you’re the only person with an account and no one else has access, why not save a few seconds by automatically loading your desktop and starting your favorite programs? That way, your PC is always ready to go when you show up.
How do I enable auto logon?
Auto logon is governed by a set of values in the Windows registry. Because of that, you can turn on automatic logon in one of three ways:
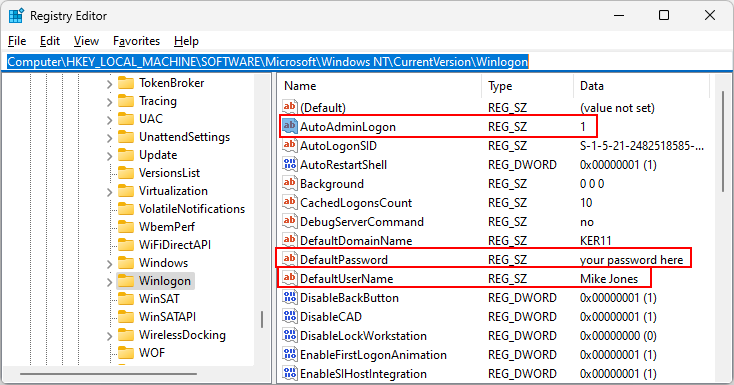
- Run “regedit” and manually update the Windows registry. You’ll add three new values:
However, that method is discouraged because you record your password in plain text in the registry (see the screenshot above). Anyone with access to the registry can see your password.
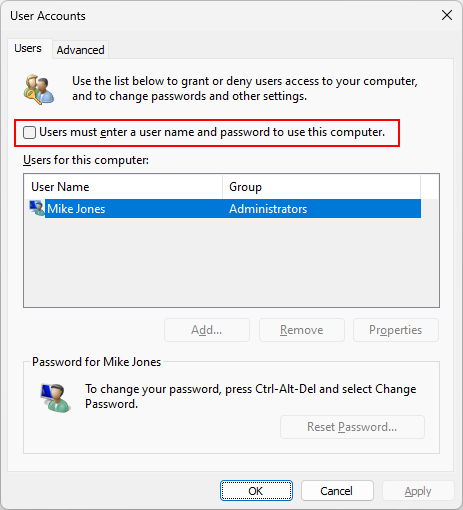
- Run the netplwiz command. In the User Accounts window that pops up, uncheck the Users must enter a user name and password to use this computer option, click OK and follow the prompts:
If you don’t see the checkbox at the top, you may have to restore it first.
From a security perspective, netplwiz stores your password encrypted in the Local Security Authority (LSA) subsystem. That’s better than storing your password in plain text, but it’s not foolproof either. More on that later when we discuss security risks.
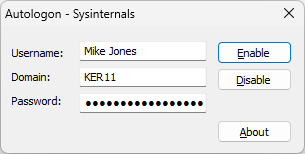
- Download and run Microsoft’s free Autologon utility. Its interface is straightforward and to the point:
Note that Autologon also stores your password encrypted in the LSA system so it’s no more or less secure than using “netplwiz”.
We recommend using Microsoft’s Autologon tool. It’s safer than manually hacking the registry and it’s easier to use than “netplwiz”. Furthermore, Autologon works the same way on all versions of Windows.
When is automatic logon a security risk?
Auto logon raises security concerns in a couple of areas.
Risk #1: Anyone with physical access to your PC can use it
The first risk is easy to imagine.
Under normal circumstances, your PC boots up to the login screen. Anyone wanting to use the computer must authenticate — usually by providing a user name and password.
But with automatic logon, that authentication step is removed. Once Windows signs in to the designated account and loads the desktop, anyone who walks up to the computer has full access to the device.
That may not be an issue in a private, home environment but it could lead to disaster in a public setting. Someone with malicious intent could cause a lot of trouble.
Risk #2: An administrator can obtain your password
This second risk is more technical.
If you enabled auto logon by editing the registry, your password is trivially available to anyone who can run regedit. So don’t so that! At minimum, you should use one of the methods that encrypts your password. Again, Microsoft Autologon gets our vote.
Unfortunately though, the password encryption doesn’t provide as much protection as it should.
Recall that your encrypted password is managed by the Local Security Authority (LSA) subsystem. The LSA stores its sensitive information — LSA secrets — in a protected area of the registry. That protection is better than nothing, but the reality is that anyone with administrator level access can read the encrypted LSA secrets.
But as it turns out, LSA secrets aren’t very secret. You may be amazed to learn that free tools like Nirsoft’s LSASecretsView can crack the encrypted passwords in a matter of seconds!
The upshot is that if you setup auto logon, it’s possible for an administrator to discover the password to your account.
What can I do to mitigate the risks and make auto logon safe?
Here are a five tips to improve security and reduce the risks associated with automatic logon.
Tip #1: If the computer has a physical console, lock the screen after logon
Here, the idea is to quickly put up the login screen after the auto logon has occurred. If that’s done, no one walking up the computer will have access without first signing in.
To implement that solution:
Create a new batch file and add this line:
rundll32.exe user32.dll,LockWorkStation
When run, that command locks your screen. You will have to log in to use your computer. Run it now and see!
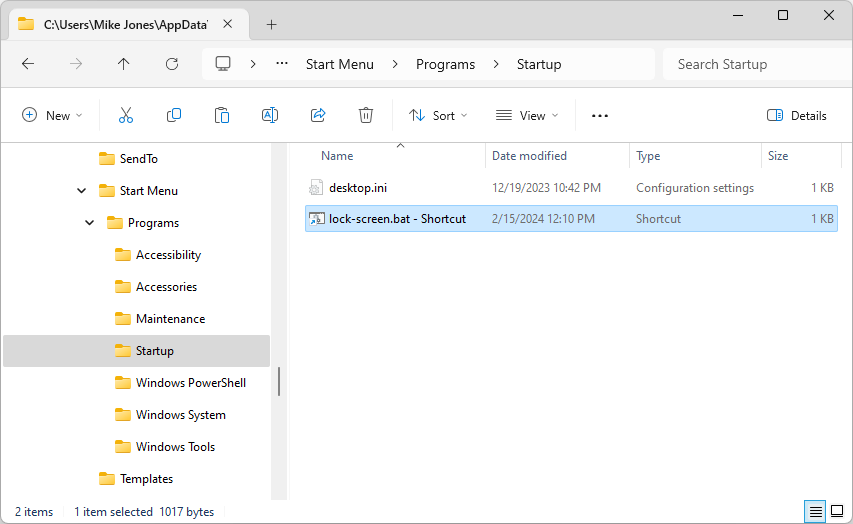
Place a shortcut to the batch file in your startup folder, so that it starts whenever you sign in.
With that new startup batch file in place, Windows will automatically log you in and lock the screen soon afterwards. Your computer will once again be protected from unauthorized users.
Note however — there may be a short period where your computer is unprotected. That’s because it may take a few seconds for Windows to run the batch file that locks the screen.
In our experiments, we noticed between 5 and 30 seconds where the desktop was visible and unlocked. For much of that time though, the computer wasn’t usable as Windows was busy preparing the desktop. The period of accessibility was quite small.
Tip #2: Even better, only activate auto logon when there isn’t a physical console
Of course, the problems of unauthorized access to the physical console go away if there isn’t one!
That makes auto logon safer if you’re operating a virtual machine. In that situation, you don’t have to worry about anyone using your computer without having to authenticate first (via RDP or some other remote access technology).
Tip #3: Only setup auto logon for a local account — avoid using a domain account
As described in risk #2, it’s possible for an administrator to discover your password when auto logon is enabled. That’s a significant weakness that should not be ignored.
However, the vulnerability is diminished if the auto-logon user has local access only.
If that’s the case, even if a malicious administrator discovers the password, that doesn’t open any new attack surfaces for the device. After all, the attacker is an already an administrator — who has full access to the machine. Giving him control of a local account doesn’t add much.
However, it may be a big problem if the auto-logon user is a domain account — with access to other computers. Cracking the password could have serious ramifications because it would allow the attacker to sign in to other devices on your network. Please do your best to avoid that predicament by limiting the scope of the auto-logon user.
Tip #4: Set a unique password for the auto-logon account
In conjunction with limiting auto logon to a local user only, be sure to specify a unique password for the account. That way, if the password is cracked, it cannot be used to infiltrate another system.
Yes — this is simply good, common sense password hygiene that we should practice in all situations. Nevertheless, we call it out here for emphasis.
Tip #5: Don’t enable auto logon on your portable device
You should never bypass the login screen on your laptop or portable device. What if it gets stolen? If so, the lucky thief would have easy access to all your files, emails, contacts and other precious data. Just don’t do it.
What are the alternatives to automatically logging in to my computer?
If your objective is to start one or more applications automatically when your computer boots, there are a couple of alternatives to auto logon.
Alternative #1: Run your important applications 24/7 as Windows Services
The Windows Services architecture is Microsoft’s premier solution for software that must run all the time. As a Windows Service, your application will start at boot — before anyone logs on — and run continuously in the background.
There are two ways for you to leverage the Windows Services infrastructure:
Convert your application to a native Windows Service. This involves updating the application’s code to integrate it with the Windows Services Control Manager (SCM).
Unfortunately, that can be an expensive and complex undertaking. Indeed, if you’re not a programmer (or don’t have access to programming resources) it may not be a viable option for you.
Employ a “service wrapper” to run your application in the context of a Windows Service. You won’t have to update your application’s code or do anything like that. Simply provide your application to the wrapper and the wrapper will take care of the rest.
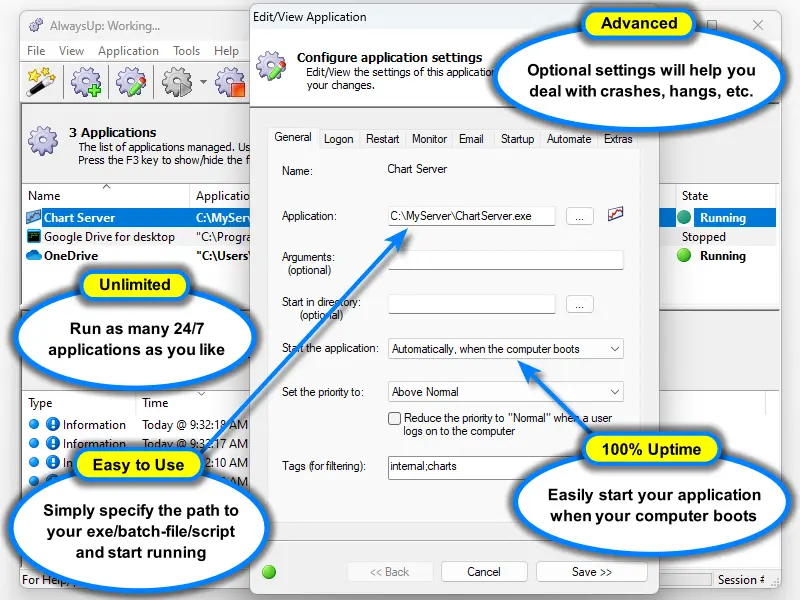
For example, our AlwaysUp program is a service wrapper that will start any application at boot and keep it running 24/7/365, even in the face of crashes, hangs and other interruptions. For your convenience, AlwaysUp comes with a free 30-day trial — so that you can make sure it works well for you before you spend any money.
Alternative #2: Launch programs with Task Scheduler
You can also start a program at boot using the Windows Task Scheduler.
Even though a scheduled task isn’t as robust as a Windows Service — you can read about the differences when compared to AlwaysUp, if you’re curious — the Task Scheduler can cover basic situations.
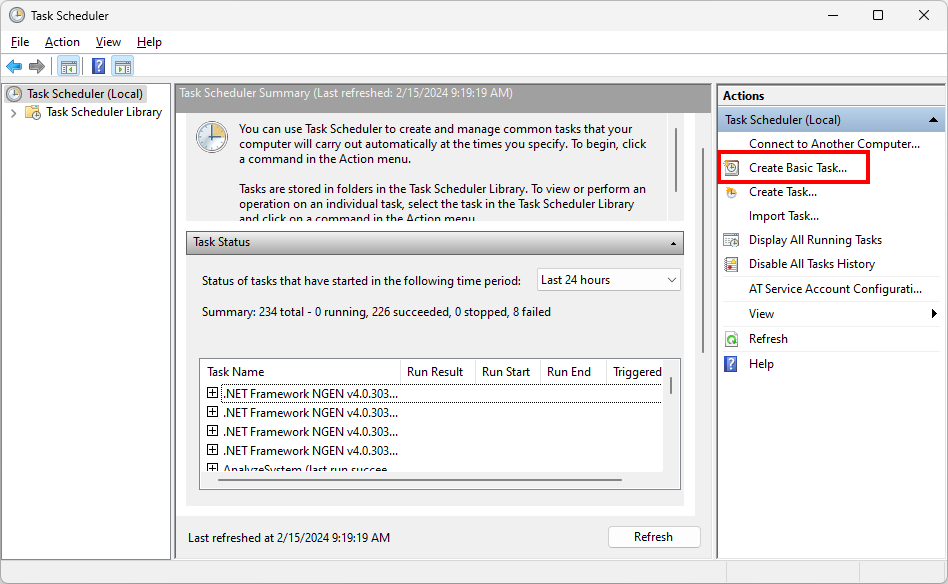
To setup a task to launch your program at boot, open the Task Scheduler (“schtasks.exe”), click the Create Basic Task link on the right and follow the self-explanatory prompts.
Questions or concerns about auto logon? Let us know
Hopefully you now have a better understanding of how automatic logon works. On the other hand, if you have any questions that were not covered, please don’t hesitate to get in touch. Our experienced technical team will try to help.
Stay safe out there!




















 We purchased AlwaysUp to run a batch file that runs a web front end for a database. But when we plug it in it doesn’t work. AlwaysUp tries to run the script but gives up after five tries.