Posted onJanuary 10, 2021 (Revised September 24, 2021)
How can I tell if someone updated the services on our Windows 2019 server? Do you have any tools for that?
— Sheldon P.
Hi Sheldon.
Since Windows Services run with high privileges, it’s very important to keep an eye on them. And because of their inherent power, services are a prized target for bad actors looking to hack your system.
Indeed, 2020’s SolarWinds supply chain exploit — one of the worst attacks in the past decade — featured a rogue Windows Service depositing malware in the background. A periodic review of the list of services could have identified the compromise months earlier.
Anyway, our free Windows Service Auditor is an excellent monitoring tool that can help you in your situation. Follow these instructions to keep a watchful eye on your mission-critical servers.
1. Download & run Windows Service Auditor
Windows Service Auditor is portable application, meaning that you don’t need to install it. Simply download the executable file and place it in a folder where you can easily find it.
Double-click the file to start it. In a few seconds, a window listing all your Windows Services will appear:
2. Update your computer’s security policy to allow advanced auditing
By default, Windows does not keep track all changes made to Windows Services. That capability must be enabled via advanced security audit policies. Specifically, you need to watch for:
Windows Service Auditor makes it easy to enable that auditing in your local policy. To do so, open the Application menu and ensure that the Enable Local Audit Policy entry is checked:
3. Enable auditing for important Windows Services, to track who starts/stops/changes them
Do you care about the activities of a specific Windows Service? Even though we have enabled advanced auditing in step 2, you must enable auditing for each service that you would like to monitor.
To enable auditing of a service in Windows Service Auditor, highlight the service and check the Selected Service > Enable Auditing menu entry:
With auditing in place for a service, the Windows Event logs will record an event whenever someone attempts to start, stop or modify the service. And to save you from hours of digging through the Event Viewer, Windows Service Auditor will collect those records in the lower Events panel:
4. Capture a baseline snapshot of all services running on your machine
This short video shows how to capture a snapshot of all the services running on your computer:
To summarize:
Start Windows Service Auditor;
Select All Services > Export (XML);
Choose a file name where the services should be saved.
The file will contain an XML record for each service installed on your computer:
5. Compare future snapshots to the baseline, to identify changes
Whenever you want to check if any services have changed, you should:
Create a new snapshot XML file, as described in the previous section;
Using your favorite text comparison tool, compare the new snapshot to the baseline you established in the previous section.
The text comparison tool will highlight all changes that have taken place in between the snapshots.
We recommend using WinMerge — a free, mature text differencing tool for Windows.
For example, we established a baseline snapshot on December 29. On December 31, we wanted to see what changed with services so we took another snapshot. Afterwards, comparing the two snapshots with WinMerge identified 8 differences, including one showing that the TrustedInstaller service was stopped:
Best of luck managing your system!
UPDATE — September 24 2021: Now find out when a service’s executable has been modified
Windows Service Auditor version 3 includes a few vital improvements that will help you identify when your Windows Services have changed unexpectedly.
In the new version, Windows Service Auditor now captures the following fields that uniquely identify the executable file supporting the service:
path: The full path to the executable file started by the service.
date-modified: The date and time that the service’s executable file was last modified.
size: The size of the service’s executable file, in bytes.
hash: The SHA-256 hash value of the contents of the service’s executable file. This is a fingerprint that uniquely identifies the executable.
product-name: The “Product name” set in the service’s executable file (visible on the “Details” tab of the file’s properties)
company: The “Company” set in the service’s executable file (visible on the “Details” tab of the file’s properties)
file-description: The “File description” set in the service’s executable file (visible on the “Details” tab of the file’s properties)
file-version: The “File version” set in the service’s executable file (visible on the “Details” tab of the file’s properties)
For example, here is the XML captured for the “Print Spooler” service (which was compromised in June 2021):
With those fields included in the XML, the “diff” outlined above will highlight when the service’s executable has changed. No one will be able to swap out (or impersonate) the underlying file without it showing up on your radar!
Posted onDecember 28, 2020 (Revised April 3, 2022)
Do you run Box Drive as a Windows Service, to ensure that file synchronization starts as soon as your server boots? If so, please be aware that Box Drive version 2.18 may not start properly in the background!
Version 2.18 was released in October 2020. We took it for a test drive with AlwaysUp and here is what we discovered.
Box Drive starts but quickly exits
AlwaysUp started Box.exe several times. Each time, the process would run for a second and then shut down. After 5 attempts (as configured on the Restart tab), AlwaysUp gave up.
The activity report shows the back and forth:
Unfortunately the Box.exe process exited with a generic return code, with no indication of what happened. Puzzled, we decided to investigate the logs.
The log files report a strange problem
Box Drive spools its logs to a location in the AppData folder. You can find the files here:
A file named “Box-2.18.117.log” records the program’s activities when it starts. We noticed these telltale lines inside:
[36;49m2020-12-27 18:45:23.667 7596 INFO MainThread windows_sync_app_dele Calling start_application: [‘C:\\Program Files\\Box\\Box\\Box.exe’] [36;49m2020-12-27 18:45:23.667 7596 INFO MainThread windows_sync_app_dele Current memory usage: 90279936 bytes [36;49m2020-12-27 18:45:23.667 7596 INFO MainThread windows_sync_app_dele A Box Drive installation is in progress. Box Drive cannot continue to run
So for some bizarre reason, Box Drive thinks that an installation is in progress!
Thinking that it may be causing a conflict, we stopped and disabled the Box Update Service (which is responsible for automatic updates):
However, that didn’t make a difference. The “installation is in progress” error continued to thwart us.
So clearly Box Drive is having trouble running with AlwaysUp. But was the problem caused by AlwaysUp? We decided to investigate with an independent, third-party utility.
The problem isn’t limited to AlwaysUp — PsExec fails too
Microsoft’s free PsExec utility can start any executable in Session 0 — the only session available when your machine boots. PsExec is useful when troubleshooting applications that have trouble running at boot.
We ran this command line to launch Box as a specific user in Session 0:
But the run ended with the same result in the logs as before.
So the issue is not unique to AlwaysUp. For some strange reason, Box Drive version 2.18 simply refuses to run in the background, on the isolated Session 0.
Box Drive starts properly in the current, interactive session
As it does when started normally on your desktop, Box Drive runs fine as a Windows Service outside of Session 0.
If you select Start “Box Drive” in this session from the Application menu in AlwaysUp, Drive (and its familiar tray icon) will appear on your screen:
Of course, that will not be possible unless you log in, which defeats the purpose of launching file synchronization automatically at boot! Fortunately, AlwaysUp can help you get around that.
Configure automatic logon with AlwaysUp to start Box Drive at boot
Since Box needs a “normal” session to run at boot, you can:
Setup Windows autologon, to automatically sign in to Windows when your machine boots;
Have AlwaysUp launch Box Drive in that user’s session.
A few weeks ago, our developers reported the problem to Box Support. The detailed message documented all our key findings, including the log messages/files and the two methods of easily reproducing the failure.
The response from the Box Customer Success team was blunt, though not entirely unexpected:
Even so, it’s a bit short sighted of them to dismiss a problem that is impacting their paying customers!
Box Drive version 2.19 is “coming soon”
Apparently version 2.19 of Box Drive will be available very soon, probably in early 2021. Hopefully it will fix this “phantom installation” problem when running as a Windows Service.
Posted onDecember 14, 2020 (Revised April 3, 2022)
News flash: Most of the applications running on your computer were not started by you. Windows launched them automatically — either at boot or when you logged in.
And while most of those programs exist for a good reason — to help you access the Internet, print a document or play a game — some may be unnecessary. Those freeloaders run all the time, hogging precious resources and slowing down your computer.
Indeed, this is a huge problem on new Windows laptops and desktops. A myriad of “free”, manufacturer-supplied applications constantly trying to up-sell you antivirus, office, or cloud storage that you don’t want or need will cripple your once-speedy device. Welcome to a very frustrating experience!
Luckily there is a free and easy way for you to regain control of your computer. Simply follow these steps:
1. Download and Install Autoruns
Autoruns is a free utility from Sysinternals (a subsidiary of Microsoft). The program has a simple mandate — to reveal every single application Windows started without your explicit action.
Installation is straightforward. Simply extract the contents of the zip file to a new folder. We recommend placing it in C:\Apps\Autoruns.
2. Start Autoruns
Launch the Autoruns executable (autoruns.exe). You will have to accept the obligatory license agreement on the first run:
The main window will come up. You may notice colorful lines streaming into the interface as Autoruns interrogates your system:
You will see a whopping 17 tabs — each one representing a location from where applications are launched!
As its name implies, the Everything tab consolidates all tabs.
3. Look for programs you don’t need
Most of the locations will be obscure and unfamiliar. For example, only the most technical folks need to pay attention to “Boot Execute” (low-level tasks that Windows runs to prepare itself) and “LSA Providers” (libraries supporting encryption).
Three tabs may be most useful:
Logon: Programs Windows started after you sign in to your computer. They are usually running visibly on your desktop, either in full-fledged window or squirreled away behind an icon in the task tray area.
Scheduled tasks: Applications and scripts launched at a specific time (or occasion). These are typically short-running maintenance tasks — there to keep one of your main applications in tip-top shape.
Scroll the list to see what applications are started automatically when you sign in. Highlight an entry in the list and the bottom pane will show key details.
For example, here we see that version 2.13 of Box is configured to start automatically with the “-m” flag:
Autoruns will help you research unrecognized programs too.
Simply right-click an entry and select Search online to open a browser search page targeting the underlying executable:
Or select Properties to dig into the details of the program on your hard drive:
And if you are truly adventurous, select Jump to Folder to launch the Registry Editor and go straight to the application’s registry key.
3. Disable or delete unwanted auto-start entries
Once you have identified an application that Windows should not start automatically, you have a couple of options:
Un-check the box on the left to disable the application startup. The entry will remain there, making it easy to re-enable the item at a later date.
Delete the entry. This will remove the application from the startup list. Only delete if you are confident and you will never want to re-enable the automatic launch in the future.
Note that deleting the Autoruns entry only removes the launch at startup. It does not uninstall the underlying application, which you can still run manually.
Posted onNovember 30, 2020 (Revised January 7, 2023)
We’re closing out the tumultuous 2020 with version 12.5 of AlwaysUp — our “run anything as a Windows Service” utility used by tens of thousands of savvy computer administrators across the globe.
This release delivers a few major enhancements:
File synchronization fixes for Dropbox 105+ running as a service
Dropbox threw us a curve-ball in September. With the advent of version 105, Dropbox suddenly stopped synchronizing files to the cloud when it was running as a service in Session 0.
This issue affected many of our customers, and as the Dropbox automatic updates started rolling out, the emails and complaints started coming in!
After a few days of frantic experimentation, our developers arrived at an effective and simple solution. Apparently setting the QT_OPENGL system variable to software restores all functionality. Dropbox copies files again.
We decided to incorporate the fix into AlwaysUp, to save new Dropbox customers from having to manually set QT_OPENGL. AlwaysUp Version 12.5 and later will automatically set the QT_OPENGL environment variable so that you don’t have to.
One word of caution: If it turns out that setting the QT_OPENGL variable causes problems in a future version of Dropbox, you can neutralize the fix through another environment variable. Set the ALWAYSUP_NO_DROPBOX_OPENGL_FIX system variable to any value and AlwaysUp will not alter the QT_OPENGL value.
Emails include recent service/application activity
Customers who have configured email alerts will notice that messages now contain the service’s last five events from the Windows Event Logs. The idea is to provide helpful context when something unusual happens, to avoid you having to log on and interrogate the event logs yourself.
Here is an email showing the new Recent Activity section:
Specify when Windows launches “Automatic (Delayed Start)” services
By default, services with startup type set to Automatic (Delayed Start) start 120 seconds after the last automatic service is launched.
That two minute gap is fine for most, but what if your server is blazing fast? In that case, one minute may be better.
Or worse, suppose your legacy server is painfully slow to boot? A five minute delay may be more appropriate there.
Looking at the release notes, 20H2 doesn’t include significant changes to the Windows Services infrastructure. The update focused mostly on end-user improvements for the Edge browser, task tray notifications and the like.
Nevertheless, our team tested AlwaysUp 12.5 extensively on the new version of Windows 10. We’re pleased to report that no problems were detected and AlwaysUp remains fully compatible with all versions of Windows 10.
As usual, please review the release notes for the full list of features, fixes and improvements included in AlwaysUp 12.5.
Upgrading to AlwaysUp 12.5
If you purchased AlwaysUp version 11 (after June 2018), you can upgrade to version 12.5 for free. Simply download and install “over the top” to preserve your existing applications and all settings. Your registration code will continue to work as well.
This seems like strange behavior, but when you are using autologon to launch an application in session 1 and reboot the server, during the reboot AlwaysUp briefly relaunches the application in session 0. Here’s an example from the activity log:
Why does that happen? How do I prevent it from happening?
— Kevan
Hi Kevan. We have seen this before…
You’re encountering a Race Condition as Windows shuts down
Unfortunately you are experiencing the effects of the chaotic and poorly documented Windows shutdown process.
From the timeline you have provided, you initiated the reboot at about 10:26 AM, right? Within a few seconds of that, Windows logs off the user signed in to Session 1.
That system-initiated logoff terminates Session 1. Windows stops all programs running in Session 1 — forcibly if necessary. And since your application is running in Session 1, it’s terminated too. That happens at about 10:26:08.
AlwaysUp, which is constantly monitoring your application in the background, immediately notices that the Session is closed and that your application has stopped. AlwaysUp writes an informative log entry at 10:26:08:
Next, AlwaysUp springs into action to ensure that your application runs 24/7. It knows your preference is to run in Session 1, but that’s no longer possible. The only reliable place to restart your application is in the session that is always available to Windows Services — the isolated Session 0.
So AlwaysUp starts your application in Session 0. The log line at 10:26:09 confirms that action:
However, during the process of rapidly restarting your program in Session 0, AlwaysUp is notified of another important event. Windows is shutting down. This is reported at 10:26:09 too:
And finally, a mere two seconds later, both the application and service stop.
So the only hiccup — as you mentioned — is the unnecessary, “phantom” restart that happens at 10:26:08. This is because AlwaysUp is not aware of the system shutdown at the time when it detects the application outage. AlwaysUp is just doing it’s job, trying to make sure that your application is always running, 24×7.
This is a classic race condition, where two events (“session closed” and “system shutting down” notifications) occur in an unpredictable order. When AlwaysUp is notified of the shutdown first, it won’t restart your application. However, when AlwaysUp learns of the session close first, it will restart your application. And unfortunately you never know which sequence/behavior you’re going to get. 🙂
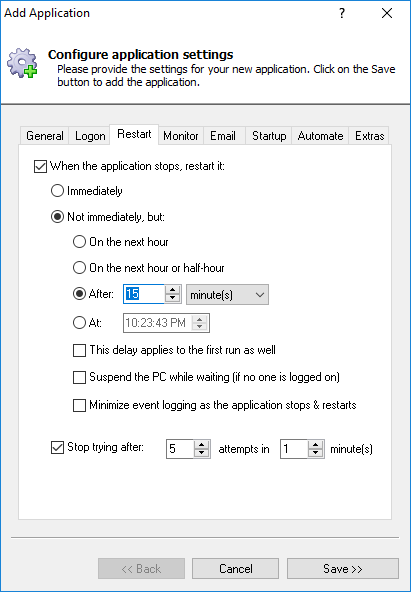
How to avoid application restarts during Windows Shutdown
To overcome the problem, configure AlwaysUp to wait for a few seconds before restarting your application. Make that change on the Restart tab.
For example, here we have instructed AlwaysUp to delay for 15 seconds:
That short pause should provide enough time for AlwaysUp to receive the Windows shutdown notification and exit gracefully — without a phantom restart.
Of course, this adjustment means that AlwaysUp will not restart your program immediately if it crashes. If that’s a problem (i.e. your application must achieve close to 100% uptime), you may want to reduce the delay. Even 5 seconds should be sufficient to sidestep the dreaded race condition.

")


![Q&A: Why doesn't OneDrive Delete my Files when Running as a Windows Service? [RESOLVED]](https://www.coretechnologies.com/blog/wp-content/uploads/onedrive-delete-files-problem-150x150-1.png)


")
 (click to enlarge)")
")
")
")


")
")
")
")
")
")
")


")
")
")
")


")
")
")
")
")


