|
How to Install LibreOffice as a Windows Service with AlwaysUp |
Automatically start LibreOffice in headless/API mode whenever your computer reboots. Keep it running 24x7x365 in the background.
LibreOffice is a popular, free, open source office suite. It has been available since 2010.
Most users run LibreOffice interactively, but the software can also run headless — invisible, servicing requests from other applications. This tutorial focuses on headless operation.
To install LibreOffice as a Windows Service:
-
If necessary, download and install LibreOffice.
-
Construct the command line that will run LibreOffice in headless mode, as you like.
The command line reference lists all the options (also available by running "soffice.exe --help").
Please validate and make sure that your command works from a prompt! If it does not, then it will not work as a Windows Service either.
This command line did the trick for us; we'll automate this command as a service in a later step:
soffice.exe --headless --invisible --accept="socket,host=0.0.0.0,port=8100;urp;StarOffice.Service"
-
Download and install AlwaysUp.
-
Start AlwaysUp.
-
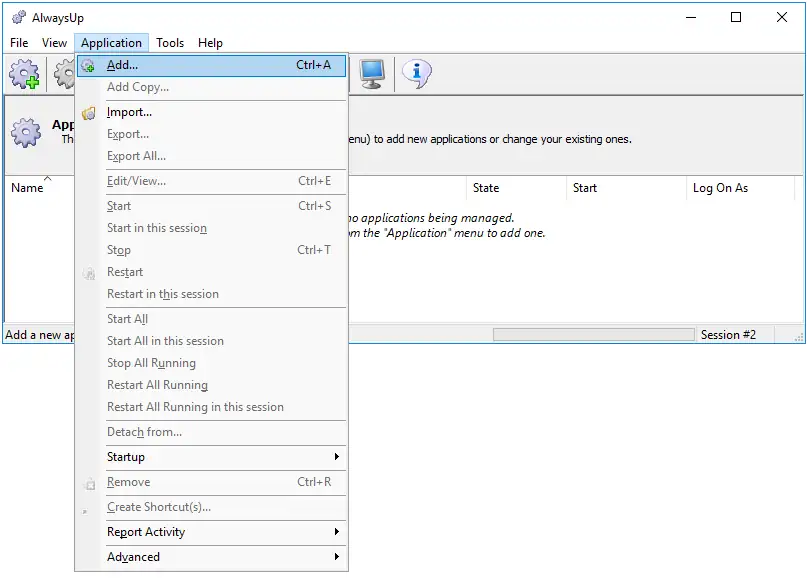
Select Application > Add to open the Add Application window:
-
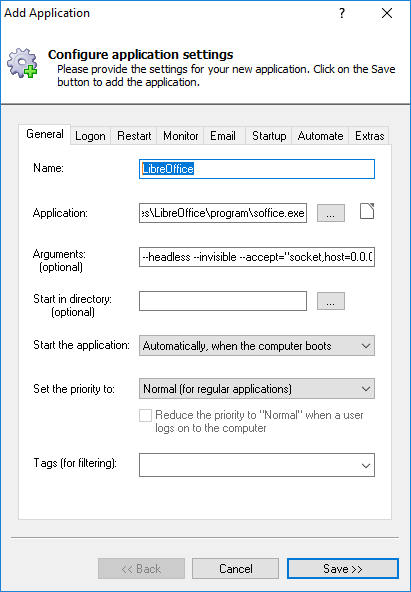
On the General tab:
-
In the Application field, enter the full path to the LibreOffice executable, soffice.exe.
If you installed LibreOffice in the standard location, that path will be:
C:\Program Files\LibreOffice\program\soffice.exe
-
In the Arguments field, enter soffice.exe command line parameters you identified in step 2. Be sure to enclose components in quotes as required.
-
In the Name field, enter the name that you will call this application in AlwaysUp.
We have entered LibreOffice but you can enter another value if you like.
-
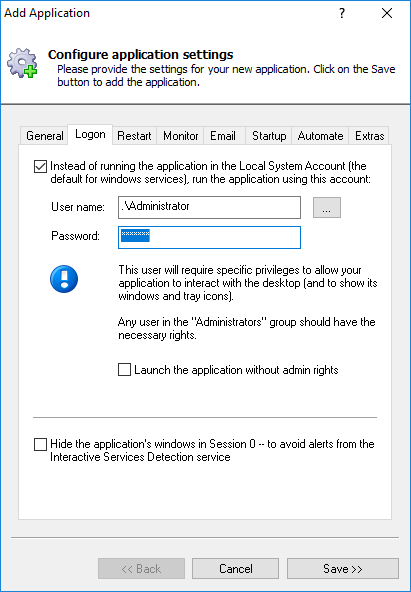
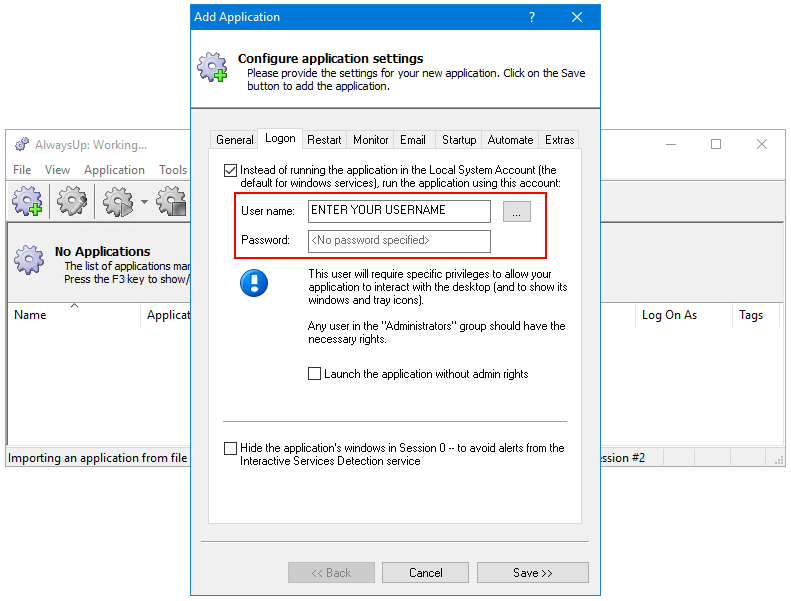
Click over to the Logon tab. Check the box at the top and enter the username and password of the Windows account where you installed LibreOffice.
You must run LibreOffice from that account, where all installation and registry settings are available.
-
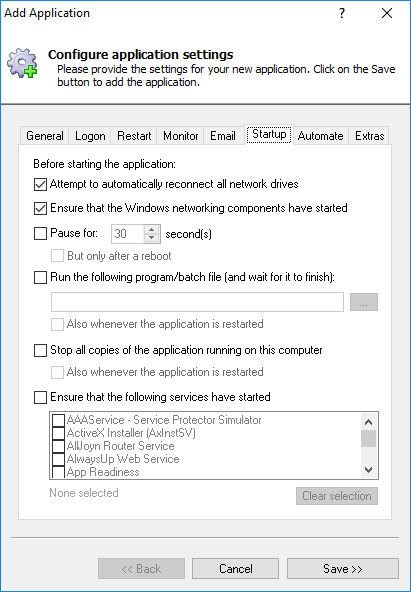
Switch to the Startup tab and check the Ensure that the Windows Networking components have started box.
This tells AlwaysUp that LibreOffice needs the TCP/IP stack to do its work.
-
We are done configuring LibreOffice as a Windows Service so click the Save button to record our settings.
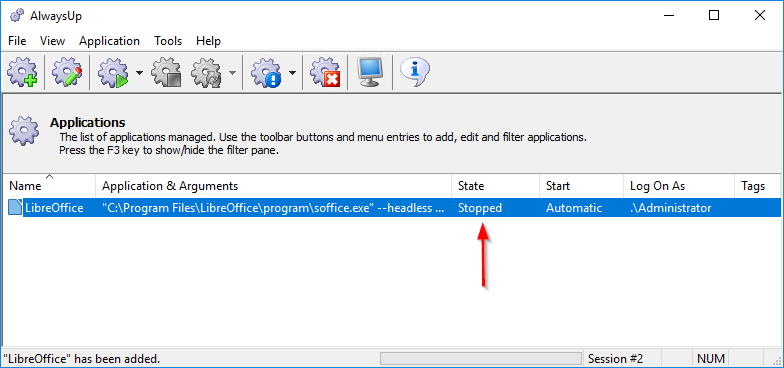
In a couple of seconds, a new entry for LibreOffice (or whatever you called it) will show up in the AlwaysUp window.
Notice that the state will be "Stopped" because the service is not yet running:
-
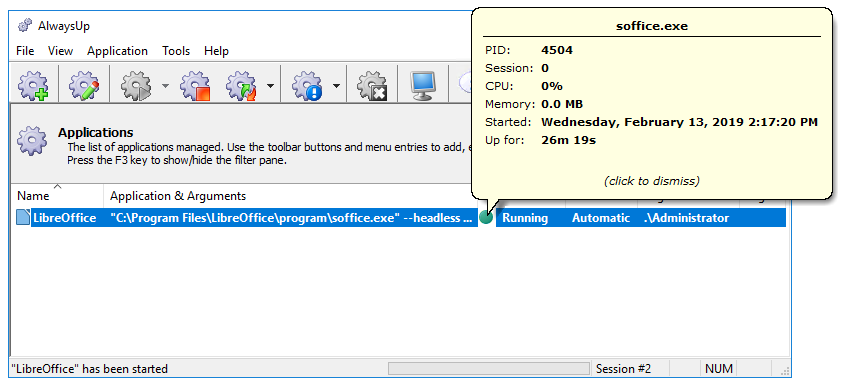
To start LibreOffice as a service, choose Application > Start "LibreOffice". The entry's state should change to "Running" after a few seconds and LibreOffice will be running headless in the background.
Click the green circle to see details of the "soffice.exe" process:
-
That's it! Next time your computer boots, LibreOffice will start immediately, before anyone logs on.
We encourage you to edit the service in AlwaysUp and check out the many other settings that may be appropriate for your environment.
For example, restart LibreOffice once per week (to cure memory leaks), send an email if the LibreOffice fails, setup a weekly report, and much more.
Download & Import the LibreOffice Settings File
For your convenience, we have provided an AlwaysUp Settings File with all the settings recommended in this guide.
To use the file:
Download LibreOffice_alwaysup.xml to your computer. Please make a note of where you save it. In AlwaysUp, select Application > Import from the menu. Choose the file you downloaded in step 1. -
Make the following adjustments in the Add Application window:
Click Save to record your new LibreOffice service.
LibreOffice not working properly as a Windows Service?
Consult the AlwaysUp Troubleshooter — our online tool that can help you resolve the most common problems encountered when
running an application as a windows service.
From AlwaysUp, select Application > Report Activity > Today... to bring up a HTML report detailing the interaction between AlwaysUp and LibreOffice.
The AlwaysUp Event Log Messages page explains the messages that may appear.
Browse the AlwaysUp FAQ for answers to commonly asked questions and troubleshooting tips.
Contact us and we will be happy to help!
|
Over 97,000 installations, and counting!
|
 |

|
Rock-solid for the past 20+ years!
|
Fully Compatible with 160+ Applications...
|

