|
How to Run aria2 as a Windows Service with AlwaysUp |
Automatically start aria2 in the background whenever your computer boots. Run it periodically to keep web files synchronized or keep it going continuously to support your webui-aria2 downloads
Last Updated on July 15, 2026
aria2 is a lightweight, command-line download utility supporting a variety of Internet protocols.
To install aria2 as a Windows Service:
-
If necessary, download and expand the aria2 zip file to a new folder your machine.
We placed it in "C:\aria2" and we'll use that folder throughout this guide.
-
Download and install AlwaysUp, if necessary.
-
Start AlwaysUp.
-
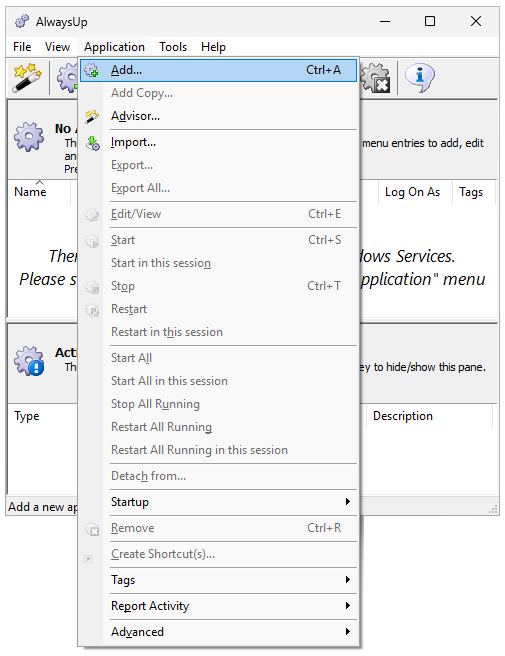
Select Application > Add to open the Add Application window:
-
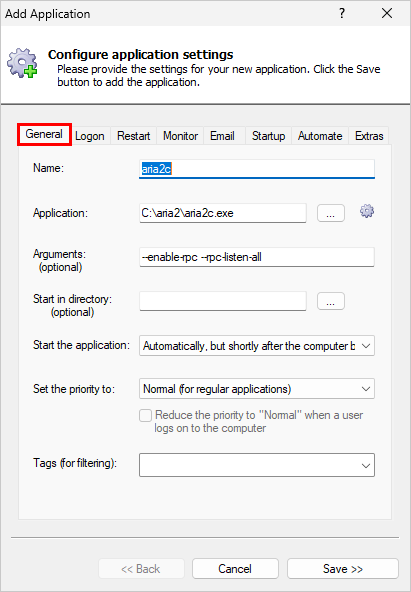
On the General tab:
-
In the Application field, enter the full path to the aria2 executable, aria2c.exe. Since we have aria2 in "C:\aria2", we'll enter:
C:\aria2\aria2c.exe
-
In the Arguments field, enter the parameters for your aria2 command line to run as a service. Since we'd like to use
webui-aria2
to manage downloads, we'll need aria2 to process JSON-RPC/XML-RPC requests. Our arguments will be:
--enable-rpc --rpc-listen-all
The full list of command line flags for aria2c is
available here.
-
In the Start the application field, select Automatically, but shortly after the computer boots.
That makes Windows launch aria2c.exe 1-2 minutes after a reboot — after critical Windows Services are up and running.
-
In the Name field, enter the name that you will call the application in AlwaysUp.
We used aria2c but you can specify almost anything you like.
-
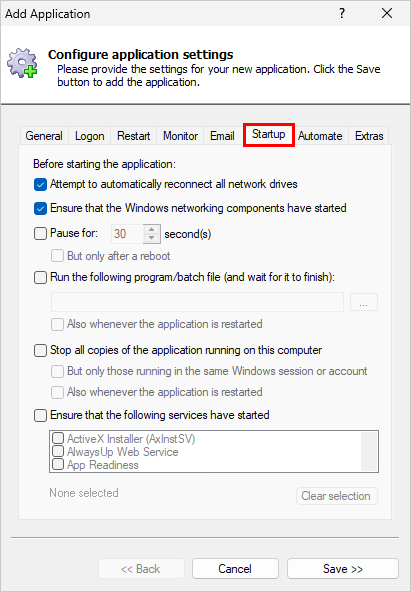
Click over to the Startup tab and check the Ensure that the Windows Networking components have started box.
This informs AlwaysUp that aria2 needs the TCP/IP networking stack to operate.
-
We're done configuring aria2 so click the Save button to record your changes.
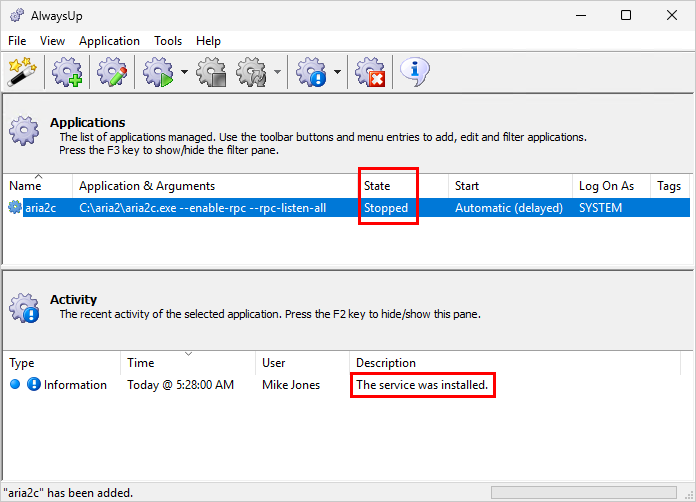
In a couple of seconds, an application called aria2c will show up in the AlwaysUp window.
It's not yet running though and the state will be "Stopped":
-
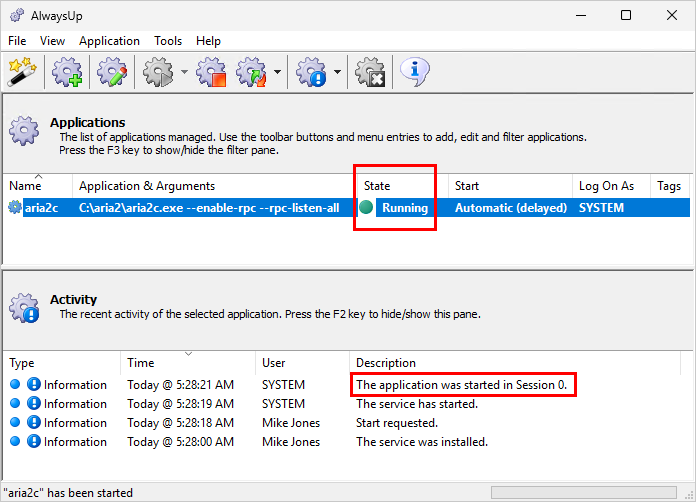
To start aria2, choose Application > Start "aria2c". After a few seconds the state will transition to "Running":
Note that aria2's will be running in the isolated Session 0.
You won't see its console on your desktop.
Select Application > Start "aria2c" in this session, to temporarily bring the console onto your screen.
-
That's it! Next time your computer boots, aria2 will start up immediately, before anyone logs on.
We encourage you to edit aria2 in AlwaysUp and check out the many other settings that may be appropriate for your environment.
For example,
set up a nightly restart to keep things "fresh",
boost the priority of aria2c.exe to give it more CPU cycles,
and much more.
aria2 not working properly as a Windows Service?
Consult the AlwaysUp Troubleshooter — our online tool that can help you resolve the most common problems encountered when running an application as a Windows Service.
From AlwaysUp, select Application > Report Activity > Today to bring up an HTML report detailing the interaction between AlwaysUp and aria2. The AlwaysUp Event Log Messages page explains what each message means.
Browse the AlwaysUp FAQ for answers to commonly asked questions and troubleshooting tips. Contact us and we will be happy to help!
|
Over 97,000 installations, and counting!
|
 |

|
Rock-solid for the past 20+ years!
|
Fully Compatible with 160+ Applications...
|